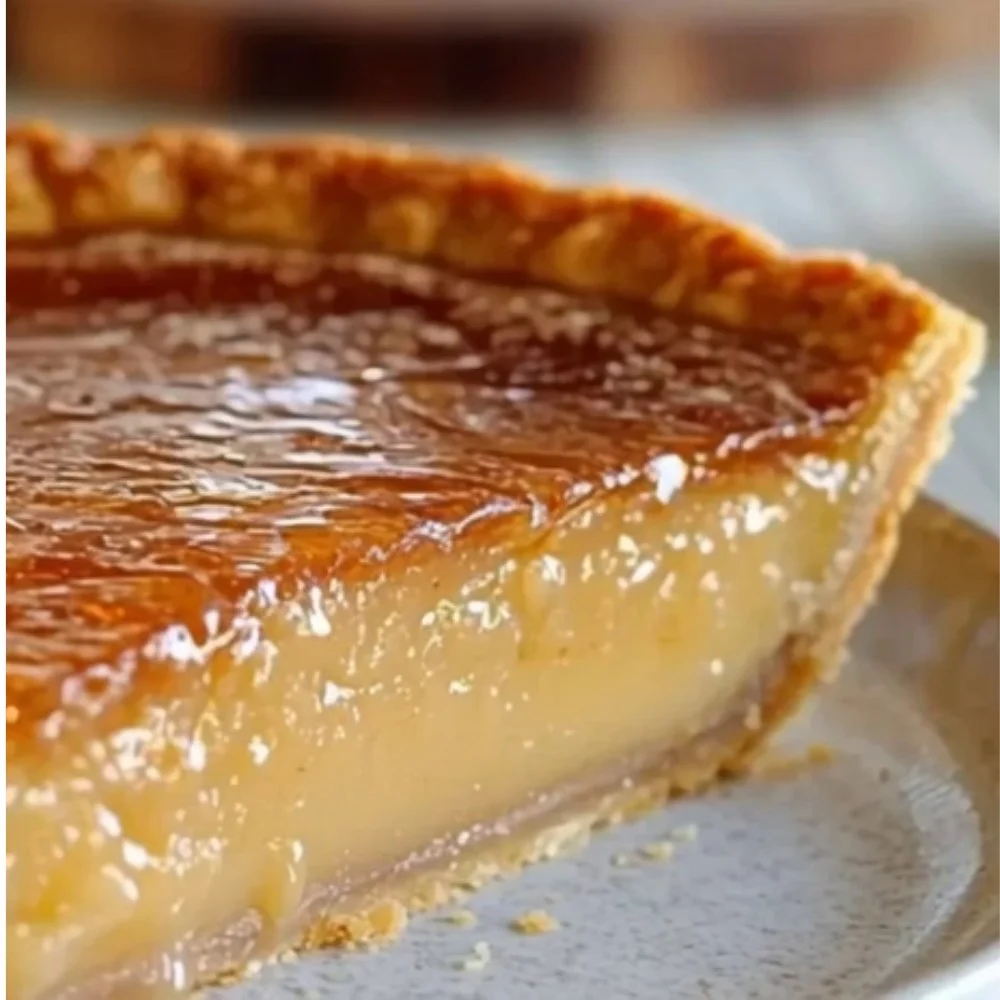
There’s something quietly mesmerizing about a pie that balances deep, caramelized sweetness with a cool, silky custard — enter Burnt Honey Pie. Perfect for late-summer evenings when the last jars of golden honey are at their richest, or for autumn gatherings when you want a showstopping, from-scratch dessert, this pie is worth trying. The star is, of course, the honey: gently darkened until it sings with toasty, almost smoky notes that transform a simple custard into a cozy, grown-up treat. If you love comforting homemade desserts and the idea of playing with caramel flavors, this Burnt Honey Pie will quickly become a seasonal favorite. If you like honey-forward desserts, consider pairing it with a crisp fruit course like these baked pears with feta and cranberries: baked pears with feta, honey and cranberries.
Ingredients & Equipment
Ingredients
- 1 pie crust (9-inch, store-bought or homemade)
- 1 cup honey
- 4 large eggs
- 1 cup heavy cream
- 1/4 cup sugar
- 1 teaspoon vanilla extract
- 1/2 teaspoon salt
Notes:
- Use a good-quality honey with floral complexity — wildflower, clover, or orange blossom work beautifully. Darker honeys (buckwheat, chestnut) will give a stronger, more robust finish.
- A single pre-made pie crust is an easy shortcut, but a flaky homemade crust adds warmth and texture.
Helpful Equipment
- Saucepan (medium, heavy-bottomed) — for caramelizing the honey
- Mixing bowl and whisk (or a blender for extra smoothness)
- Measuring cups and spoons
- 9-inch pie dish
- Rubber spatula
- Oven thermometer (optional, but helpful)
- Baking tray (to catch any spills)
- Fine-mesh sieve (optional, for smoothing the filling)
- Kitchen torch (optional, for adding a brûléed top)
Tip: A blender can make the filling ultra-smooth; if using one, cool the caramel a little before blending with eggs to prevent cooking the eggs too fast.
Step-by-Step Instructions (with tips)
Follow these base directions, expanded with explanations, safety tips, and variations to get the best Burnt Honey Pie every time.
1. Prepare and preheat
Preheat your oven to 350°F (175°C). Place the pie dish with the crust on a baking tray (this makes the pie easier to handle and keeps your oven clean if the filling bubbles).
Tip: If your oven runs hot or you’re worried about the crust browning too quickly, tent it loosely with foil after the first 10–12 minutes of baking.
2. Caramelize the honey
In a medium heavy-bottomed saucepan over medium heat, pour in 1 cup honey. Heat the honey, stirring occasionally, until it darkens and caramelizes, about 5–10 minutes.
How to tell: The honey will thin, darken to a deep amber (or slightly darker), and become very fragrant. Watch carefully — honey can go from fragrant to burnt quickly.
Variation — stovetop vs oven-roasted honey:
- Stovetop (recommended): Gives you direct, fast control over the color and flavor. Stir frequently and keep the heat moderate.
- Oven-roasted: Spread honey in a shallow, oven-proof dish and place it in the preheated oven, checking every 5 minutes until it darkens. This hands-off method is gentler but less precise.
Kitchen safety tip: Hot honey can burn badly. Use long-handled spoons and keep kids away while caramelizing.
3. Whisk together eggs, sugar, vanilla, and salt
In a mixing bowl, whisk together the 4 large eggs, 1/4 cup sugar, 1 teaspoon vanilla extract, and 1/2 teaspoon salt until smooth and slightly frothy.
Tip: For an ultra-silky custard, use a blender on low to mix the eggs and sugar.
4. Temper and combine with caramelized honey and cream
Once the honey is caramelized, remove the pan from heat briefly. Slowly add the heavy cream (1 cup) to the hot honey — it will bubble and steam. Stir to combine and let the mixture cool slightly (2–3 minutes). Then, slowly add small amounts of the hot honey-cream mixture to the egg mixture while whisking constantly. This “tempering” step prevents the eggs from scrambling.
Variation — blender method:
- If you prefer a super-smooth texture, add the slightly cooled honey-cream mixture to a blender, pulse once to combine, then stream the blended liquid into the eggs while the blender runs on low. This is fast and minimizes risk of curdling.
Tip: If you’re nervous about curdling, transfer the tempered egg mixture back to the saucepan and warm gently on low while stirring — do not boil — until it thickens slightly.
5. Pour into crust and bake
Pour the filling into the pie crust. Smooth the top with a spatula. Place the pie on the middle rack and bake for 25–30 minutes, until the center is just set and still slightly jiggly (it will firm up as it cools).
Doneness test: Gently shake the pie. If the center jiggles slightly like gelatin, it’s done. Overbaking will yield a firmer, more custard-like texture; underbaking may result in a too-soft center.
Extra touch: For a brûléed finish, sprinkle a thin layer of sugar on top and torch briefly once the pie is chilled.
6. Cool and rest
Let the pie cool on a rack for at least 2 hours, then chill for 3–4 hours (or overnight) before slicing. This helps the flavors settle and the texture to firm to the ideal creamy slice.
Serving tip: Serve the pie slightly chilled or at cool room temperature with a dollop of whipped cream or a scoop of vanilla ice cream for contrast.
Variations & Flavor Suggestions
- Salted Burnt Honey Pie: Sprinkle flaky sea salt on top before serving for a salty-sweet contrast (think salted honey pie vibes).
- Citrus lift: Add 1 teaspoon of finely grated orange zest to the egg mixture for a bright note.
- Nutty crunch: Scatter toasted pecans or walnuts over the top just before serving for texture contrast.
- Boozy notes: Stir 1–2 tablespoons of bourbon or dark rum into the mixture after tempering for warmth and complexity.
- Crust swaps: Use a graham cracker crust for a biscuit-like base or a nut crust (almond or hazelnut) for richness.
If you enjoy savory pot-pie flavors as well, a bowl of chicken pot pie soup is a comforting complement — try this hearty version: high-protein chicken pot pie soup.
Storage, Freezing & Make-Ahead Tips
Storing leftovers
- Refrigerate: Store leftover Burnt Honey Pie tightly covered with plastic wrap or in an airtight container in the refrigerator. It will keep well for 3–4 days.
- Note: The custard will continue to absorb moisture and the crust may soften slightly over time. Re-crisp the crust briefly under the broiler for 1–2 minutes (watch carefully).
Freezing
- Freeze whole pie: You can freeze the fully baked pie by wrapping it well in plastic wrap and foil. It will keep for up to 2 months. Thaw overnight in the refrigerator before serving.
- Freeze slices: Wrap individual slices in plastic wrap and store in a freezer-safe container to make portioning easier.
- Best practice: Freezing a pie before baking is possible (assemble the pie and freeze solid, then bake from frozen adding 10–15 minutes to the bake time), but custard pies can sometimes change texture after freezing. For best quality, freeze only if necessary.
Make-ahead
- Bake the pie up to 24 hours ahead and refrigerate. This is perfect for entertaining — making the pie a day ahead allows the flavors to meld and saves oven time on the day of your gathering.
- Assemble the filling ahead, keep chilled, and pour into a pre-baked crust just before baking if you prefer very fresh crust crispness.
How to Use / Serve This Dish
Serving ideas
- Classic: A slice served with freshly whipped cream and a few toasted nuts.
- Ice cream: A scoop of vanilla or brown-butter ice cream makes a luxurious pairing.
- Cheese board finish: Offer small slices alongside a cheese board — tangy goat cheese or blue cheese contrasts nicely with the pie’s sweetness.
- Warm topping: Spoon a warm berry compote over a slice for seasonal brightness.
Occasions
- Holiday centerpiece: The deep caramel notes make it a lovely alternative to pumpkin or pecan pies for Thanksgiving.
- Afternoon tea: Serve in small wedges with tea or coffee for a cozy get-together.
- After-dinner treat: Finish a dinner party with a small slice, a fortified wine, or a rich espresso.
If you’re in the mood for other small pies and seasonal bakes, mini pumpkin pies provide similar cozy vibes and are lovely alongside a honey pie: mini pumpkin pies.
FAQ
Q: Can I substitute the heavy cream with milk? A: You can, but heavy cream gives the pie its rich mouthfeel and helps stabilize the custard. If using whole milk, the texture will be lighter and slightly less creamy. For a richer non-dairy option, use full-fat coconut milk (it will add a subtle coconut flavor).
Q: How long will this pie keep at room temperature? A: Because this is an egg- and cream-based custard, it should not be left out at room temperature for more than 2 hours. Store refrigerated and serve chilled or at cool room temperature.
Q: I’m worried about the eggs curdling when I add hot honey — how do I avoid that? A: Tempering is the key. Slowly add a small stream of the hot honey-cream mixture into the eggs while whisking vigorously to raise their temperature gradually. If you’re still nervous, use a blender or bring the tempered mixture back to the saucepan, heating gently while stirring until slightly thickened.
Q: Can I make this gluten-free or vegan? A: For gluten-free, use a gluten-free pie crust. For vegan, it’s trickier because eggs and dairy are central to custard texture — try looking for vegan custard recipes that rely on silken tofu, cornstarch, or aquafaba and adapt the burnt honey flavor, but expect a different texture. For inspiration on switching up comfort recipes, this chicken pot pie soup adaptation shows how recipes can be made hearty and accommodating: chicken pot pie soup — a cozy embrace in a bowl.
Conclusion
Burnt Honey Pie is a deceptively simple dessert that packs complex, cozy flavors — the caramelized honey gives it warmth and depth while the custard keeps each slice silky and comforting. Whether you bake it for a seasonal gathering or as a special weekend treat, it’s an easy way to celebrate honey’s golden magic and homemade hospitality. If you’re curious to see professional takes or similar baked goods for inspiration, explore this artisanal Burnt Honey Pie from Flamingo Estate: Burnt Honey Pie – Flamingo Estate, or check a bakery version at Grand Opening: Burnt Honey Pie — Grand Opening. For another home-tested recipe reference, here’s a Burnt Honey Pie entry with tips and variations: Burnt Honey Pie. If you love salted contrasts, David Lebovitz’s take on a salted honey pie offers useful technique and flavor ideas: Salted Honey Pie – David Lebovitz.
Give this Burnt Honey Pie a try — take your time with the caramelization, temper those eggs, and enjoy the cozy, seasonal comfort of a slice shared with friends and family. If you make it, I’d love to hear how you served it and what variations you tried — share a photo or a note the next time you bake!

Burnt Honey Pie
Ingredients
For the pie crust
- 1 pie crust (9-inch) 1 pie crust (9-inch, store-bought or homemade) A pre-made option is convenient, but a homemade crust adds warmth and texture.
For the filling
- 1 cup 1 cup honey Use high-quality honey, such as wildflower or orange blossom.
- 4 large eggs 4 large eggs
- 1 cup 1 cup heavy cream Can substitute with full-fat coconut milk for a non-dairy option.
- ¼ cup 1/4 cup sugar
- 1 teaspoon 1 teaspoon vanilla extract
- ½ teaspoon 1/2 teaspoon salt
Instructions
Preparation
- Preheat your oven to 350°F (175°C). Place the pie dish with the crust on a baking tray.
Caramelizing the honey
- In a medium heavy-bottomed saucepan over medium heat, pour in the honey. Stir occasionally until it darkens and caramelizes, about 5–10 minutes.
Mixing the filling
- In a mixing bowl, whisk together the eggs, sugar, vanilla, and salt until smooth and slightly frothy.
- Remove the caramelized honey from heat and slowly add the heavy cream, stirring to combine. Let it cool slightly for 2–3 minutes.
- Slowly add small amounts of the honey-cream mixture to the egg mixture while whisking constantly to temper the eggs.
Baking the pie
- Pour the filling into the pie crust and smooth the top. Bake for 25–30 minutes until the center is just set and slightly jiggly.
- Let the pie cool on a rack for at least 2 hours, then chill for 3–4 hours before slicing.


1 thought on “Burnt Honey Pie – Toffee-Like Flavor in Every Bite”