Ten Easy Fermented Vegetable Recipes for Beginners will open a world of tangy, crunchy, and comforting flavors that make seasonal produce feel brand new. If you’re curious about turning crisp cabbage, carrots, cucumbers, beets, and radishes into lively, probiotic-rich side dishes, this friendly guide walks you through approachable recipes that celebrate texture and bright, savory-sour notes. These sauerkrauts, quick pickles, kimchis, and lacto-ferments are perfect for cooler evenings or sunny picnics alike, and they pair beautifully with cozy meals like hearty soups — for more cozy meal ideas, check out this helpful roundup of best hearty soup recipes to enjoy alongside your ferments.
Why Ferment Vegetables?
Fermenting is an age-old, hands-on way to preserve peak-season vegetables, intensify flavor, and add a probiotic boost to everyday meals. For beginners, the beauty is in the simplicity: salt, water (sometimes), vegetables, and a bit of patience. These recipes emphasize natural bacteria working with minimal equipment, and they’re forgiving — perfect for home cooks who enjoy comfortable, from-scratch dishes.
Ingredients & Equipment
Below are common ingredients and tools you’ll use across these ten recipes. I’ll call out specific items per recipe in each recipe’s notes, but these basics will get you started.
Ingredients (general)
- Cabbage (green or red)
- Carrots
- Cucumbers (kirby or pickling cucumbers)
- Radishes
- Beets
- Green beans
- Bell peppers
- Garlic
- Fresh ginger
- Green onions or chives
- Non-iodized salt (sea salt or kosher salt)
- Filtered water (if making brine)
- Spices: black peppercorns, mustard seeds, coriander seeds, dill seeds, whole cloves, bay leaf, turmeric, red pepper flakes (adjust heat to taste)
- Optional: a little sugar or grated apple for sweeter ferments
Notes: Use firm, fresh produce. Non-iodized salt is preferred because iodine and anti-caking agents can inhibit fermentation.
Equipment
- Glass mason jars with lids (16–32 oz and 1–2 quart sizes)
- Fermentation weights or small clean stones (to keep vegetables submerged)
- A sturdy mixing bowl
- Knife and cutting board
- Vegetable peeler or mandoline (optional for uniform slices)
- Funnel (optional for neat jar filling)
- A clean cloth and rubber band or jar covers for air circulation during early fermentation
- A small jar lifter or tongs to remove weights
- Blender (for beet-based spreads or dressings, optional)
- Baking tray (if you prefer roasting beets or carrots before fermenting for a milder flavor)
- Thermometer (useful to monitor ambient fermentation temperature)
Helpful tools: An airlock lid system is optional but helpful if you want a lower-maintenance, less-burpy ferment.
For a side of comfort, these ferments are wonderful with baked mains or casseroles like a rich corn casserole—try pairing them after baking something like this classic creamy corn casserole for balanced textures and flavors.
Ten Easy Recipes Overview
Below you’ll find concise recipe ideas suitable for beginners. Each recipe includes a short ingredient list, method highlights, and easy tips. Use the general ingredients above, adjusting quantities to the size of your jar and household.
- Classic Simple Sauerkraut (Green Cabbage)
- Main ingredients: shredded cabbage, salt.
- Texture/flavor: crunchy, tangy, crisp.
- Time: 1–3 weeks depending on temperature.
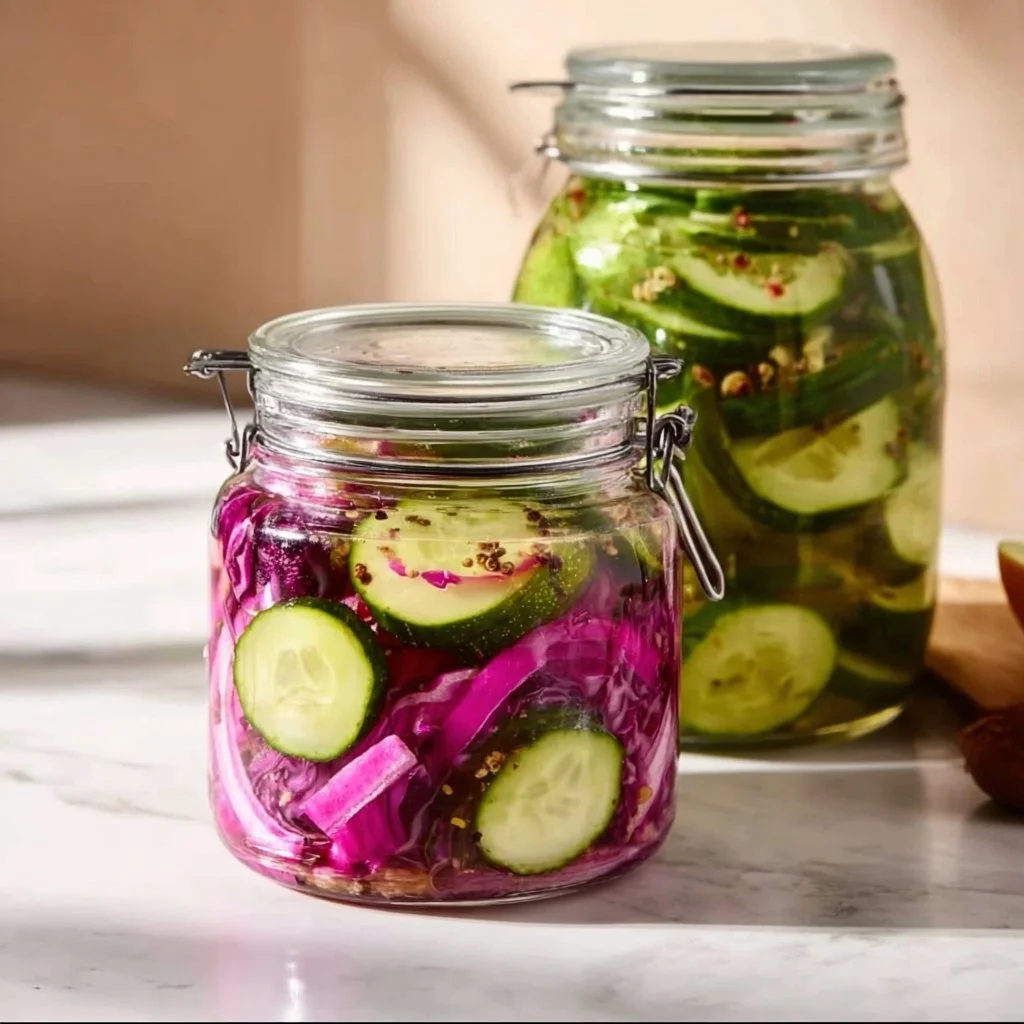
- Quick Refrigerator Dill Pickles (Cucumbers)
- Main ingredients: sliced cucumbers, dill, garlic, salt, vinegar optional for fast pickles.
- Texture/flavor: crisp, herby, bright.
- Time: ready in 24–48 hours in fridge (for lacto-fermented style, 3–7 days at room temp then refrigerate).
- Spicy Kimchi-Style Napa Cabbage
- Main ingredients: napa cabbage (or green cabbage), carrot, green onion, ginger, garlic, chili flakes.
- Texture/flavor: supple, savory, a touch of heat.
- Time: 3–7 days.
- Tangy Beet & Apple Kraut
- Main ingredients: shredded beets, grated apple, salt, caraway (optional).
- Texture/flavor: earthy-sweet, beet sweetness deepened by fermentation.
- Tip: roasting beets first gives a mellower flavor (cool before fermenting).
- Garlic-Dill Green Beans (Fermented “Pickled” Beans)
- Main ingredients: green beans, garlic, dill, salt, bay leaf.
- Texture/flavor: snappy, garlicky, versatile as a snack or side.
- Lacto-Fermented Carrot Sticks with Coriander
- Main ingredients: carrot sticks, coriander seeds, garlic, salt.
- Texture/flavor: crunchy, aromatic, great for snacking.
- Quick Radish Pickles with Ginger
- Main ingredients: sliced radishes, ginger, salt, sugar optional.
- Texture/flavor: peppery, crisp, refreshing.
- Fermented Bell Pepper Relish
- Main ingredients: chopped peppers, onion, garlic, salt.
- Texture/flavor: sweet-savory relish ideal on sandwiches or as a condiment.
- Korean Cucumber Kimchi (Oi Muchim-style, quick ferment)
- Main ingredients: cucumbers, sesame, garlic, green onion, salt.
- Texture/flavor: juicy, spicy-sesame, fast ferment.
- Beet Kvass-Inspired Beverage Alternative (Non-Alcoholic Savory Broth)
- Main ingredients: chopped beets, filtered water, salt.
- Texture/flavor: earthy, tangy, nourishing warm or chilled; this is a non-alcoholic, probiotic-rich vegetable infusion perfect as a seasonal tonic.
Step-by-Step Instructions (with tips)
Use the directions below as a base:
A. Prep and Salt Ratios
- Clean your workspace and jars. Sterilize jars if you prefer, but clean is usually sufficient for fermentation.
- Weigh or eyeball: a general rule is about 1–2 tablespoons of salt per 1 quart of vegetables by weight for vegetable ferments (rough guideline: 2% salt by weight for many ferments). For beginners, 1–2% is safe and yields pleasant results. If using a non-precise method, start with 1 tablespoon of salt per pound of vegetables and adjust over time.
- For shredded or chopped vegetables, mix thoroughly with the measured salt in a large bowl. Massage cabbage to release juices — this creates the natural brine for sauerkraut.
B. Brine vs. Dry-Salt Method
- Dry-salt method: used for sauerkraut, cabbage, carrots. Salt draws out juices so veggies sit in their own brine.
- Brine method: dissolve salt in filtered water to make a brine (e.g., 1 tablespoon salt to 1 cup water), then pour over vegetables in jars. Useful for whole veggies like beans or cucumbers.
C. Packing and Weighing
- Pack vegetables into jars tightly, pressing down so liquid rises above the solids. Leave 1–2 inches headspace.
- Use a weight (fermentation weight or small jar) to keep veggies submerged under brine to prevent mold.
- Cover with an airlock lid, breathable cloth, or regular lid loosely closed to allow gases to escape. If using a sealed lid, remember to “burp” jars daily to release pressure.
D. Fermentation Time & Temperature
- Ideal fermentation temperature is 65–75°F (18–24°C). Cooler temps slow fermentation, warmer speeds it up.
- Taste-test after a few days. Sauerkraut may take 1–4 weeks; quick pickles 3–10 days; kimchi often 3–7 days at room temperature, then refrigerate.
- When you like the flavor, move jars to the refrigerator to slow fermentation and preserve texture.
E. Flavor Variations and Cooking Tips
- Roasting vs. Raw: Roasting root vegetables (beets, carrots) before fermenting softens and adds caramelized sweetness; allow to cool before packing. Raw ferments keep more crunch and brighter flavors.
- Heat: control chili flakes to taste. For mild, use a small pinch; for more complex heat, add fresh chopped chile.
- Herbs & Spices: experiment with dill, caraway, coriander, mustard seeds, turmeric for color and depth.
- Safety tip: If you see fuzzy mold (usually white and cottony) on the surface, skim it off quickly — often safe to remove. Discard if the ferment smells rotten, has pink/orange slime, or if you’re unsure.
F. Creative Variations
- Mix textures: combine thinly sliced cabbage with whole bean ferments for a crunchy-sour jar.
- Layering: alternate layers of vegetable and spice to distribute flavor evenly.
- Quick options: for a fast flavor boost, fridge pickles with a small amount of vinegar deliver crispness within 24–48 hours (still halal-friendly and great for immediate use).
For more recipe inspiration and simple fermented preparation ideas, you might enjoy this helpful collection of easy appetizer recipes that pair well with tangy ferments during gatherings.
Storage, Freezing & Make-Ahead Tips
Storing Ferments
- Refrigeration: Once the ferment reaches your desired tanginess, refrigerate to slow down the fermentation. Most refrigerated ferments last several months to a year, with flavor evolving over time.
- Label jars with start date and type. This helps you track flavor progress.
- Keep submerged: Always ensure vegetables remain under brine. Use a clean spoon to press them down before replacing the lid.
Freezing
- Avoid freezing live ferments if you want to preserve probiotic activity and crisp texture; freezing breaks cell walls and kills many of the beneficial bacteria.
- If you want to preserve fermented vegetables for cooked recipes, you can freeze them after cooking (for example, add sauerkraut to a cooked casserole then freeze that cooked dish).
- Alternatively, for beet kvass-like blends or purees, freeze portions for later thawing and use in soups or sauces (these will not have the same live probiotic quality).
Make-Ahead & Portioning
- Batch fermenting: Make multiple jars to rotate through the fridge — smaller jars are great for sampling flavors, while larger jars are efficient for weekly use.
- Portion into meal-size containers for easy grab-and-go sides, snacks, or inclusion in lunches.
- If gifting: give fresh, refrigerated ferments with instructions to refrigerate and enjoy within a few months.
How to Use / Serve These Ferments
Serving Ideas
- Breakfast: Add a spoonful of sauerkraut or kimchi to scrambled eggs or an egg sandwich for tang and crunch.
- Lunch: Top grain bowls, rice bowls, or noodle bowls with fermented vegetables for brightness.
- Snacks: Carrot sticks and fermented beans make excellent healthy snacks.
- Sandwiches & Wraps: Use bell pepper relish or quick pickles to lift sandwiches and wraps.
- Sides: Serve fermented veggies alongside roasted mains, grilled skewers, or warm casseroles to cut through richness.
- Salads: Finely chop fermented veggies and toss into salads or slaws for depth.
- Comfort pairing: Try a tangy beet or cabbage ferment with creamy or rich baked dishes to balance textures and flavors.
Creative Variations
- Mash fermented beets into a spread with yogurt or plant-based cream for a tangy dip.
- Mix chopped kimchi into fried rice or stir-fries near the end of cooking for umami depth.
- Blend fermented vegetables into dressings for salads or as a marinade base.
FAQ
Q: Is fermenting vegetables safe at home?
A: Yes—when done with clean equipment, good-quality produce, and attention to brine levels and cleanliness, vegetable fermentation is safe and low-risk. Watch for off smells, pink/orange discolorations, or slimy textures, which indicate spoilage. If in doubt, discard.
Q: Can I use regular iodized table salt?
A: While cooking with iodized salt is fine, non-iodized sea salt or kosher salt is preferred for fermentation. Some anti-caking agents and iodine can slightly slow fermentation, but many home fermenters still use table salt successfully if that’s all they have.
Q: How long do fermented vegetables last in the fridge?
A: Typically several months. Flavor continues to change; they become tangier over time. Refrigerate once the ferment reaches your preferred taste to keep it stable.
Q: Can I freeze fermented vegetables?
A: Freezing is not recommended if you want to keep live cultures and crisp texture, because freezing damages cells and reduces probiotic content. You can freeze cooked dishes that include fermented vegetables, but expect textural changes.
Conclusion
Fermenting vegetables is an inviting, seasonal way to preserve and transform garden-fresh produce into deeply flavored, probiotic-packed sides and condiments. Whether you start with a classic sauerkraut, a quick refrigerator pickle, or a gentle beet kvass-style brew, these Ten Easy Fermented Vegetable Recipes for Beginners are crafted to build confidence and bring warmth to your table. For extra beginner-friendly recipes and step-by-step ideas, this guide to Ten Easy Fermented Vegetable Recipes for Beginners is a helpful resource. If you want a wider variety of no-fail ideas to practice your new skills, check out this roundup of 5 No-Fail Fermented Food Recipes for Beginners. And for a nostalgic look at popular picks and inspiration, take a peek at the curated list of Top 10 Fermented Food Recipes of 2015. I hope you’ll try one jar this week — then another — and share your favorite combinations and photos with friends and family. Happy fermenting!

Fermented Vegetable Recipes
Ingredients
Common Ingredients for Fermentation
- 1 head Cabbage (green or red) Use firm, fresh produce.
- 2 large Carrots
- 5 medium Cucumbers (kirby or pickling cucumbers)
- 1 bunch Radishes
- 2 large Beets Roasting gives a mellower flavor.
- 1 cup Green beans
- 2 large Bell peppers
- 5 cloves Garlic
- 1 inch Fresh ginger root
- 1 bunch Green onions or chives
- 1 tablespoon Non-iodized salt (sea salt or kosher salt) Avoid using iodized salt as it may inhibit fermentation.
- 1 cup Filtered water (for brine)
- 1 tablespoon Spices (black peppercorns, mustard seeds, coriander seeds, dill seeds, whole cloves, bay leaf, turmeric, red pepper flakes) Adjust heat to taste.
- 1 teaspoon Sugar or grated apple (optional for sweeter ferments)
Instructions
Preparation and Brining
- Clean your workspace and jars; sterilizing is preferred for optimal fermentation.
- For vegetable ferments, the recommended salt ratio is 1–2 tablespoons of salt per quart of vegetables.
- Mix shredded or chopped vegetables with measured salt in a large bowl, massaging cabbage to release juices.
Packing and Weighing
- Pack vegetables tightly into jars, pressing down to allow liquid to rise above the solids.
- Use fermentation weights to keep vegetables submerged under brine.
- Cover jars with breathable cloth or loosely closed lids to allow gas escape.
Fermentation Process
- Store jars at an ideal fermentation temperature of 65–75°F (18–24°C).
- Taste-test after a few days; fermentation can take 1–4 weeks for sauerkraut, and 3–7 days for quick pickles or kimchi.
Storing Ferments
- Once desired tanginess is achieved, move jars to refrigerator.
- Label jars with the start date to track flavor progress.