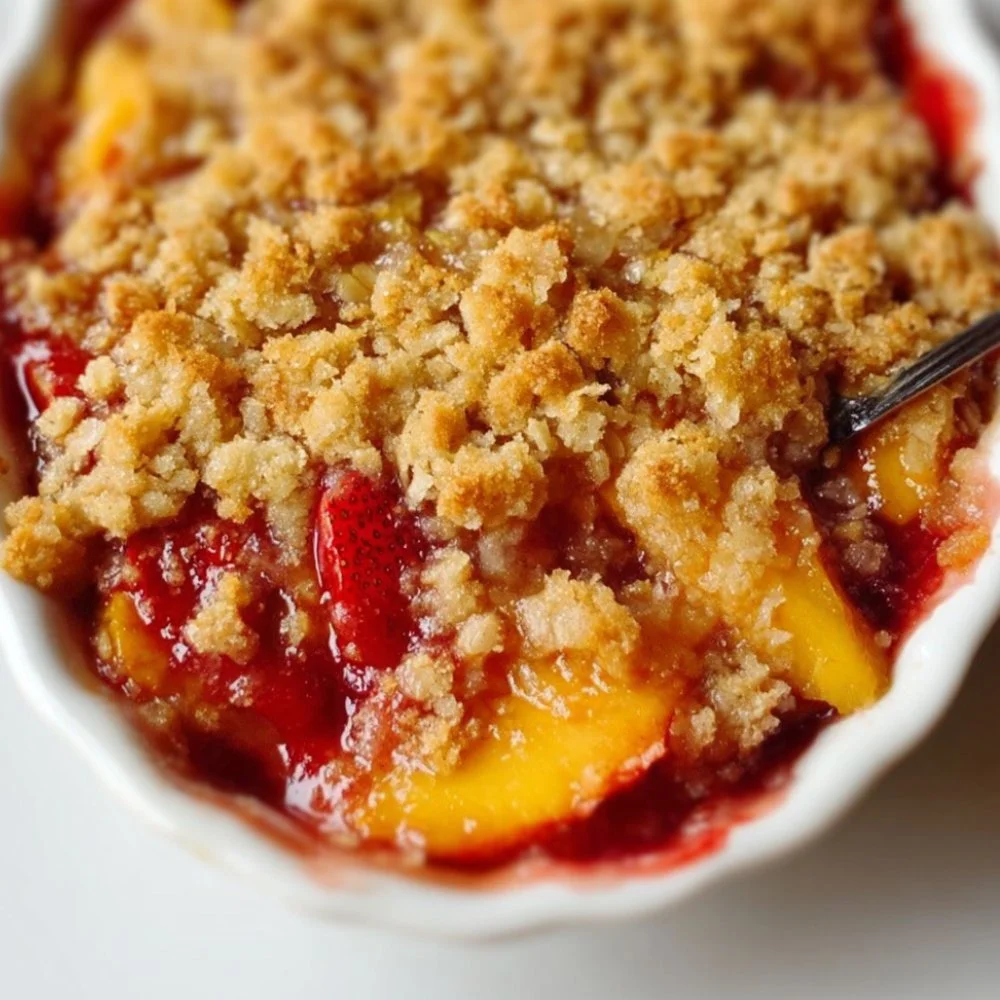
Strawberry Peach Crisp is the kind of dessert that tastes like summer wrapped in a warm, golden blanket — juicy peaches and bright strawberries bubbling under a buttery, oat-studded topping. If you’re drawn to seasonal fruit desserts that feel homemade and comforting, this crisp is worth trying: it balances tender fruit, a glossy, slightly thickened syrup, and a crunchy oat topping that browns beautifully. The recipe highlights peaches and strawberries, delivers a contrast of textures (soft fruit versus crumbly topping), and celebrates peak-season produce. If you enjoy fruit-forward dishes, you might also enjoy my take on the Millionaire Peach Salad, which uses peaches in a savory-sweet way.
Ingredients & Equipment
Ingredients
- 1/2 cup old fashioned oats
- 1/2 cup brown sugar
- 2/3 cup flour
- 1/3 cup salted butter (melted)
- 1/2 tsp. cinnamon
- 2 1/2 cups peaches (peeled and sliced (about 3 peaches))
- 1 cup sliced strawberries
- 1/4 cup brown sugar
- 3 teaspoons cornstarch
- 1/3 cup water
- 1/8 teaspoon salt
- 1/2 teaspoon vanilla extract
Equipment
- 9×9-inch baking pan (greased)
- Mixing bowls (large and small)
- Measuring cups and spoons
- Small saucepan
- Wooden spoon or heatproof spatula
- Knife and cutting board
- Peeler (optional, for peaches)
- Oven mitts
- Cooling rack
Notes and helpful tools
- Use ripe but firm peaches so they hold some shape during baking; overly soft fruit can become mushy. If your peaches are slightly underripe, a quick soak in warm water makes peeling easier.
- If you have a pastry cutter or two forks, they can help you combine the topping, though melted butter works fine for a quick, rustic crumble.
- For larger batches, a 9×13 pan will work; bake time will increase by 5–10 minutes. If strawberries are especially juicy, you can add an extra teaspoon of cornstarch.
- If you want a smoother topping texture, pulse the oats lightly in a food processor before mixing.
- If you love stacked berry desserts, try this Strawberry Milkshake Pound Cake for a different strawberry-forward treat.
Step-by-Step Instructions (with tips)
Prep overview: This recipe has three main parts — the oat topping, the fruit filling (with a glossy cornstarch syrup), and baking. Work in a few clean bowls so you can move from step to step without waiting.
- Preheat and prep
- Preheat your oven to 350°.
- Grease a 9×9 pan with butter or nonstick spray. Set aside.
- Make the oat topping
- In a medium bowl, mix 1/2 cup old fashioned oats, 1/2 cup brown sugar, 2/3 cup flour, and 1/2 tsp. cinnamon.
- Pour in 1/3 cup melted salted butter and stir just until the mixture becomes crumbly and holds together in clumps. Avoid overmixing — you don’t want a paste, just a streusel-like crumb.
- Tip: For a nuttier crunch, stir in 1/4 cup chopped toasted almonds or pecans. If you add nuts, reduce the oats by a tablespoon to keep the topping texture balanced.
- Build the base layer
- Press half of the crumbly topping into the bottom of the greased 9×9 pan to form a thin crust. This gives the crisp a nicely textured base rather than all fruit directly on metal.
- Tip: Press with the bottom of a measuring cup for an even layer.
- Add the fruit
- Top the crust with the sliced peaches (about 2 1/2 cups peeled and sliced, roughly 3 peaches) and 1 cup sliced strawberries.
- Spread fruit evenly so each bite gets a mix of peach and strawberry.
- Make the fruit syrup
- In a small saucepan over medium-high heat, combine 1/4 cup brown sugar, 3 teaspoons cornstarch, 1/8 teaspoon salt, and 1/3 cup water. Cook, stirring constantly, just until thickened — this will only take a couple of minutes.
- Remove from heat and stir in 1/2 teaspoon vanilla extract.
- Tip: Stir the cornstarch with the water to dissolve before applying heat to prevent lumps. If your filling is very juicy, add an extra teaspoon of cornstarch or reduce the water by a tablespoon.
- Combine and top
- Pour the warm syrup evenly over the fruit, making sure it reaches the fruit beneath the surface so the filling sets during baking.
- Sprinkle the remainder of the topping mixture evenly over the fruit to cover.
- Bake
- Bake at 350° for 35 minutes, or until the topping is golden and the filling is bubbling at the edges.
- Optional broil: For a crispier, more caramelized top, turn the oven to broil and place the pan on the top shelf. Broil for 2–3 minutes, watching very closely so the topping doesn’t burn.
- Tip: If the topping browns too quickly before the fruit is bubbling, loosely tent foil over the pan and continue baking.
- Rest and serve
- Allow the crisp to rest for 10–15 minutes after removing it from the oven so the filling thickens slightly and slices hold together better.
- Serve warm with a scoop of vanilla ice cream or a dollop of whipped cream (all halal-friendly dairy options).
Variations and technique notes
- Roasting vs stovetop syrup: Instead of making a cornstarch syrup, you can toss the fruit with 2–3 tablespoons granulated sugar and 1 tablespoon cornstarch, then roast fruit at 400° for 20–25 minutes until tender and slightly caramelized before adding the topping and reducing oven temp to finish — this deepens the fruit flavor.
- Gluten-free option: Substitute a 1:1 gluten-free flour blend for the 2/3 cup flour and ensure oats are certified gluten-free.
- Less sweet: Reduce the sugar in the filling to 2 tablespoons brown sugar and add a splash of lemon juice to accentuate fruit brightness.
- Make it vegan: Use coconut oil or a vegan butter substitute in place of salted butter, and serve with a plant-based frozen dessert.
Storage, Freezing & Make-Ahead Tips
Storing leftovers
- Refrigerator: Once cooled to room temperature, cover the pan tightly with plastic wrap or transfer portions to an airtight container. The crisp will keep well in the refrigerator for up to 4 days. Reheat individual portions in the microwave for 30–60 seconds or warm in a 325° oven for 8–10 minutes.
Freezing
- To freeze the whole crisp: Assemble and bake as directed, cool completely, then wrap the pan tightly with plastic wrap and a layer of foil. Freeze for up to 3 months. Thaw overnight in the refrigerator and reheat in a 350° oven until warmed through (about 20–30 minutes).
- To freeze unbaked: Assemble in a freezer-safe pan without baking, wrap well, and freeze for up to 3 months. When ready to bake, add 10–15 minutes to the bake time and check that the filling is bubbling before removing.
- To freeze portions: Spoon cooled or baked portions into airtight, freezer-safe containers with parchment between layers. Freeze for up to 2 months.
Make-ahead tips
- Prepare the topping and store it in an airtight container in the refrigerator for up to 3 days; bring to room temperature before using.
- You can slice peaches and hull strawberries up to a day ahead and keep them in the refrigerator. Toss the sliced fruit with a teaspoon of lemon juice to prevent discoloration.
- For gatherings: Bake the crisp ahead and reheat before serving to save time; add a few extra minutes in the oven so the topping regains its crunch.
Portioning advice
- This 9×9 pan serves approximately 6–8 people depending on portion size. For larger crowds, double the recipe in a 9×13 pan and increase bake time slightly. For a small household, halve the recipe and bake in an 8×8 pan for 25–30 minutes.
How to Use / Serve This Dish
Serving ideas
- Classic: Warm from the oven with a scoop of vanilla ice cream or a spoonful of whipped cream.
- Brunch-friendly: Serve alongside a tray of yogurt and granola for a summer brunch spread.
- Mini versions: Use muffin tins or individual ramekins for single-serve crisps — reduce bake time to 20–25 minutes.
- Light pairing: For a balanced summer menu, serve the crisp after a light main like grilled chicken or a chilled grain salad.
Creative variations
- Add citrus zest: Stir 1 teaspoon of lemon or orange zest into the fruit filling to brighten flavors.
- Spice it up: Mix a pinch of ground cardamom into the topping for a fragrant twist.
- Herb note: Scatter a few torn basil leaves over warm slices right before serving for an unexpected, fresh lift.
- Layered dessert: Spoon cooled crisp over panna cotta or a simple vanilla yogurt for a composed dessert parfait.
If you’re planning a fruit-forward menu, pair the crisp with a crisp, leafy salad — for a complementary fruity side, consider the Honeycrisp apple feta salad as part of a brunch spread, where sweet and savory fruit dishes play together.
FAQ
Q: Can I use frozen fruit for this crisp?
A: Yes. Use frozen peaches and strawberries straight from the freezer; do not thaw them completely to avoid excess liquid. Increase the cornstarch by 1–2 teaspoons to help absorb extra moisture, and expect an additional 5–10 minutes of bake time.
Q: My topping is soggy — what went wrong?
A: Soggy topping can happen if the fruit is too juicy or the topping was packed too firmly. Next time, add a touch more flour or oats to the topping, and make sure you only mix melted butter in until crumbly. Also avoid letting the uncooked crisp sit uncovered in the fridge for long before baking, which can draw out juice.
Q: Can I make this nut-free and allergy-friendly?
A: Yes — the base recipe is already nut-free. If you add nuts for crunch, you can simply omit them. For egg-free and vegetarian diets, this recipe is suitable as written. For vegan diets, substitute the butter with a plant-based butter alternative.
Q: How long will leftovers last, and how should I reheat them?
A: Leftovers keep in the fridge for up to 4 days. Reheat in the oven at 325° for 10–12 minutes covered lightly with foil to warm through, then remove foil for a few minutes to crisp the topping. Microwaving works for quick single portions, but the topping will soften.
Conclusion
Strawberry Peach Crisp is a small celebration of summer: juicy peaches, bright strawberries, and a comforting oat topping that’s easy to pull together anytime fruit is in season. If you try other versions of this dessert for inspiration, see this lovely take on Strawberry Peach Crisp – The Creative Bite for another home-cook’s spin. For a strawberry-peach pairing with a slightly different balance, check out Peach Strawberry Crisp – Valerie’s Kitchen. And if you want to compare techniques for topping and presentation, this recipe from Strawberry Peach Crisp – I Am Baker has beautiful photos and tips. Give this recipe a try, savor seasonal fruit, and share a warm slice with someone you love.

Strawberry Peach Crisp
Ingredients
Oat Topping
- ½ cup old fashioned oats
- ½ cup brown sugar
- ⅔ cup flour
- ⅓ cup salted butter (melted)
- ½ tsp cinnamon For added flavor
Fruit Filling
- 2 ½ cups peaches (peeled and sliced, about 3 peaches)
- 1 cup sliced strawberries
- ¼ cup brown sugar
- 3 tsp cornstarch
- ⅓ cup water
- ⅛ tsp salt
- ½ tsp vanilla extract For flavor enhancement
Instructions
Preparation
- Preheat your oven to 350°.
- Grease a 9x9-inch pan with butter or nonstick spray. Set aside.
Make the Oat Topping
- In a medium bowl, mix old fashioned oats, brown sugar, flour, and cinnamon.
- Pour in melted salted butter and stir until crumbly. Avoid overmixing.
- Tip: For added crunch, consider stirring in chopped nuts and reduce oats slightly.
Build the Base Layer
- Press half of the topping into the bottom of the greased pan.
- Tip: Use the bottom of a measuring cup for an even layer.
Add the Fruit
- Layer the sliced peaches and strawberries evenly on top of the crust.
Make the Fruit Syrup
- In a small saucepan, combine brown sugar, cornstarch, salt, and water over medium-high heat.
- Cook until thickened, stirring constantly, then remove from heat and stir in vanilla extract.
- Tip: Dissolve cornstarch with water before applying heat to avoid lumps.
Combine and Top
- Pour the warm syrup over the fruit and then sprinkle the remaining topping evenly.
Bake
- Bake at 350° for 35 minutes until the topping is golden and filling bubbles.
- Optional: Broil for 2-3 minutes for a crispier top, watching closely to prevent burning.
Rest and Serve
- Allow to rest for 10-15 minutes before serving to let the filling thicken.
- Serve warm with vanilla ice cream or whipped cream.