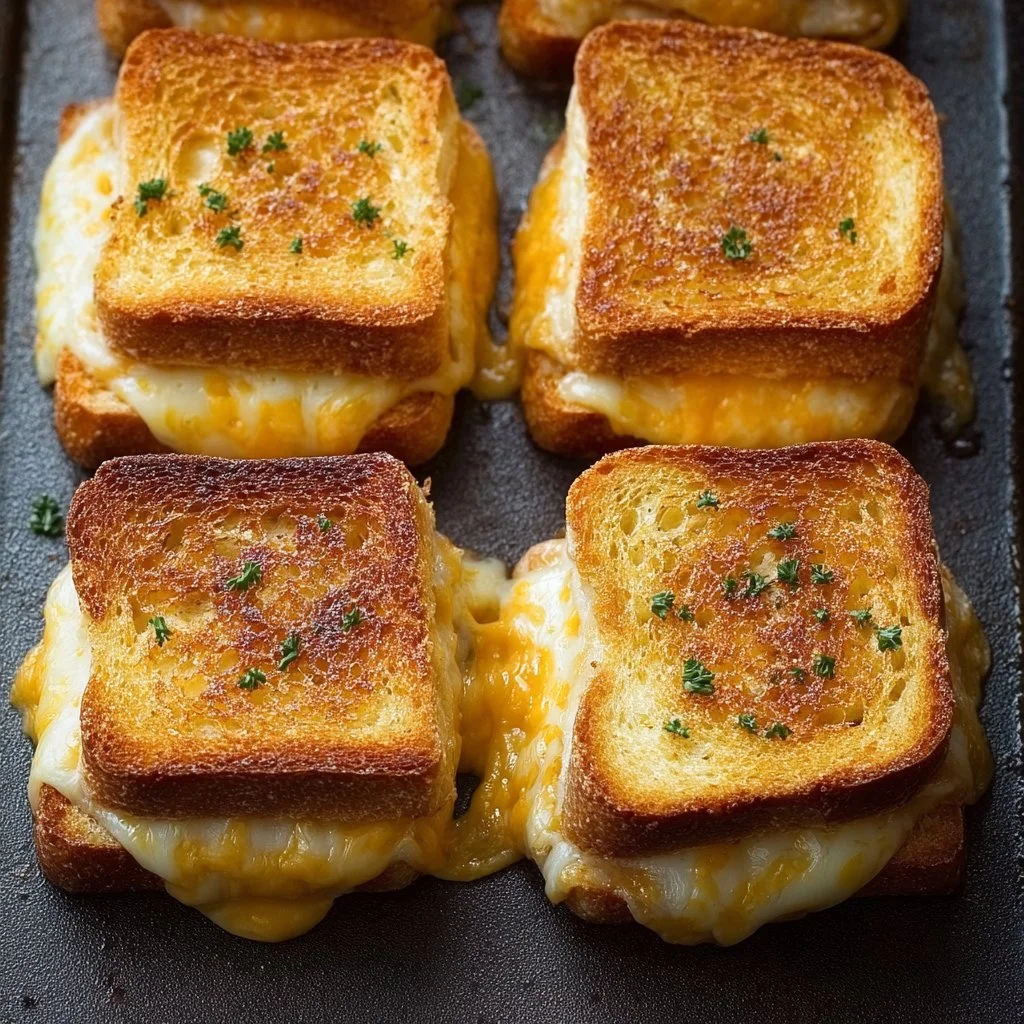
There’s something undeniably cozy about a warm, cheesy sandwich that fits in the palm of your hand — enter Mini Grilled Cheese Hawaiian Rolls. These little sliders combine the soft, sweet tang of Hawaiian rolls with gooey, melty cheese for a nostalgic, seasonal treat that’s perfect for gatherings, weeknight dinners, or a holiday appetizer table. The main ingredients—sweet Hawaiian rolls, your favorite melting cheese, and butter—are pantry-friendly and transform into something special with minimal fuss. If you enjoy playful takes on classics, try this spin on a comfort favorite and then branch out to other variations like a pesto grilled cheese for more inspiration.
Ingredients & Equipment
Ingredients
- Sweet Hawaiian rolls (one package; slider-size is ideal)
- Cheese, sliced (good options: cheddar, mozzarella, Monterey Jack, or a mix)
- Unsalted butter, softened (or melted for brushing)
- Optional add-ins: thinly sliced ham or turkey, caramelized onions, roasted garlic, sliced tomatoes, pickles, or a sprinkle of smoked paprika
Notes:
- Use good-quality sliced cheese for even melting. A mild cheddar + mozzarella blend gives great flavor and stretch.
- For a sweeter-savory contrast, keep the Hawaiian rolls unbuttered inside and add a thin spread of mustard or honey mustard.
Equipment
- Baking sheet or tray (rimmed for catching drips)
- Parchment paper or silicone baking mat (optional, for easier cleanup)
- Pastry brush or spoon (for butter)
- Sharp knife or serrated knife (for slicing rolls)
- Oven thermometer (optional—helps ensure accurate oven temp)
- Spatula or tongs (for serving)
Helpful tools: an air fryer or cast-iron skillet can be used for quick variations; a small blender isn’t necessary but a garlic press is handy if you add roasted or pressed garlic.
Step-by-Step Instructions (with tips)
-
Preheat the oven to 350°F (175°C).
Tip: If your oven runs hot or cold, use an oven thermometer so you bake at the right temperature and the tops brown evenly. -
Slice the Hawaiian rolls in half horizontally and place the bottom halves on a baking sheet lined with parchment.
Tip: Keep the rolls in one connected sheet if they came attached so you can easily pull apart the mini sandwiches after baking; this also helps them heat more evenly. -
Butter the inside of each roll (the cut sides). Spread a thin, even layer so it melts into the bread during baking.
Tip: For extra flavor, mix softened butter with a pinch of garlic powder, chopped fresh herbs, or a little honey. -
Place a slice of cheese on each buttered bottom half. Use one full slice per slider or fold slices to fit smaller rolls.
Tip: If you like extra melty stretch, layer a thin slice of mozzarella under a sharper cheddar for both flavor and gooey texture. -
Top with the other half of the roll, pressing lightly to set.
Tip: Make sure the top is centered so each slider bakes uniformly. -
Brush the tops with more butter (melted works fastest) so they develop a golden, slightly crisp crust. You can also sprinkle coarse sea salt, sesame seeds, or everything bagel seasoning for added texture.
Tip: If you want a savory-sweet glaze, brush with a mix of melted butter and honey or a tiny splash of maple syrup. -
Bake for 10–12 minutes, or until the cheese is melty and the tops are golden brown. If you want a deeper color, switch the oven to broil for the final 1–2 minutes while watching closely to prevent burning.
Tip: For small, connected trays of sliders, rotating the baking sheet halfway through helps ensure even browning. -
Remove from the oven, let cool for a minute, then serve warm. Pull apart on the baking sheet or transfer to a serving platter with a spatula.
Tip: Mini grilled cheeses are best served right away when the cheese is at its melty peak — but they also reheated well using a skillet or toaster oven to regain crispness.
Variations and cooking method tips:
- Stovetop sear: Heat a skillet over medium heat, place assembled sliders in the pan, cover with a lid and cook until the cheese melts and the top browns slightly; flip briefly to brown the bottom if needed.
- Air fryer: Place assembled sliders seam-side up in the air fryer basket at 350°F for 5–7 minutes until melted and golden.
- Broil vs. roast: Use roasting (a moderate oven temp like 350°F) for even melting and a soft crumb; use broiling sparingly to finish with a quick, high-heat browning of the tops. Avoid “boiling” bread — boiling isn’t suitable for these sliders, but you can steam or poach fillings like onions beforehand if a softer, jammy texture is desired.
- Add roasted garlic butter: Roast garlic cloves until soft, mash and mix into softened butter, then use for brushing tops for a deeper, seasonal flavor.
Storage, Freezing & Make-Ahead Tips
Storing leftovers
- Refrigerator: Place cooled sliders in an airtight container or wrap tightly with foil. Store for up to 3 days. Reheat in a 350°F oven or toaster oven for 8–10 minutes until warmed through; this helps the bread regain a bit of crispness.
- Short-term: If you plan to eat them the same day, keep them covered at room temperature for up to 2 hours (longer if room is cool).
Freezing
- Freeze unbaked: Assemble sliders on the baking tray, then wrap the tray tightly in plastic wrap and foil before freezing for up to 2 months; bake from frozen at 350°F, adding 5–8 minutes to the bake time.
- Freeze baked: Cool completely, then freeze in a single layer on a tray until firm; transfer to a freezer-safe bag and store for up to 2 months. Reheat from frozen at 350°F for 10–15 minutes, or thaw overnight then reheat.
Make-ahead strategies
- Prep assembly components: Slice cheese and slice the rolls the night before. Keep butter mix in the fridge and finish assembly just before baking.
- Partial bake: Bake assembled sliders for 5–6 minutes, cool, then refrigerate. Finish baking (brush with butter and bake another 6–8 minutes) just before serving to keep them fresh and warm at parties.
- Portioning: If feeding a crowd, count two to three sliders per adult as an appetizer portion and three to four per adult for a light main course. For kids, one to two sliders often suffice.
How to Use / Serve This Dish
Serving ideas and pairings
- Soups and salads: These sliders are a natural partner to tomato soup for dipping, or a crisp green salad with vinaigrette to balance the richness.
- Party platter: Arrange with pickles, olives, and a trio of dipping sauces—honey mustard, marinara, and garlic aioli—for a buffet-style feel.
- Brunch upgrade: Add a fried egg or avocado slice to each mini grilled cheese for a hearty brunch slider.
- Side dishes: Serve with sweet potato fries, a roasted vegetable medley, or a chilled coleslaw to round out the meal. For a comforting family-style combo, pair with a warm casserole like a broccoli cheese casserole.
Creative variations
- Ham & pineapple: Add a thin slice of ham and a sliver of pineapple for a ham-and-sweet twist reminiscent of Hawaiian flavors.
- Spicy kick: Add a smear of sriracha mayo or pepper jack cheese to introduce heat.
- Herb butter tops: Mix softened butter with chopped rosemary and lemon zest, then brush on top before baking for a fragrant, seasonal touch.
- Veg-forward: Swap in grilled zucchini slices or a smear of roasted red pepper spread; for ideas around vegetables and grilled cheese combos, see this zucchini grilled cheese for inspiration.
FAQ
Q: Can I use any type of roll?
A: Yes—Hawaiian rolls are classic for the sweet-savory balance, but you can use slider rolls, brioche buns, or small ciabatta pieces. Keep in mind the sweetness and softness of Hawaiian rolls are part of the recipe’s charm.
Q: What cheeses melt best for this recipe?
A: Cheddar, mozzarella, Monterey Jack, Colby, and fontina are excellent melting cheeses. Combining a flavorful sharp cheddar with a stretchy cheese like mozzarella gives both taste and texture. Avoid very aged, crumbly cheeses unless mixed with a melter.
Q: How long will leftovers keep, and how should I reheat them?
A: Leftovers stored in the fridge in an airtight container will last up to 3 days. Reheat in a 350°F oven or toaster oven for 8–10 minutes to refresh the crust and melt the cheese. A skillet over medium-low heat under a lid also works well to revive crispness.
Q: Can I make these vegetarian or vegan?
A: Absolutely. For vegetarian, omit any meat additions and add veggies like roasted bell peppers or caramelized onions. For vegan, use plant-based butter and vegan cheese slices designed for melting; results vary by brand, so pick one labeled “melts well.”
Conclusion
There’s something truly comforting about Mini Grilled Cheese Hawaiian Rolls—their soft, slightly sweet buns hugging warm, melty cheese feel like a hug for the stomach and soul. They’re wonderfully adaptable for seasonal flavors: add roasted garlic in the fall, fresh herbs in spring, or a bright tomato slice in summer. If you want a tried-and-true version from another home cook’s perspective, check out a glowing take on this idea at this Hawaiian roll grilled cheese recipe. For a brand-style mini baked take with useful tips for parties, visit Mini Baked Grilled Cheese. And if you enjoy exploring variations, here’s another blogger’s playful recipe to compare techniques and ideas: Mini Grilled Cheese – Chelsea’s Messy Apron. Give these sliders a try, tweak them to match your pantry and mood, and share the cozy results with friends and family — I’d love to hear which combo becomes your new seasonal favorite.

Mini Grilled Cheese Hawaiian Rolls
Ingredients
Main Ingredients
- 1 package Sweet Hawaiian rolls Slider-size is ideal.
- 8-12 slices Cheese, sliced Cheddar, mozzarella, Monterey Jack, or a mix are good options.
- 4 tablespoons Unsalted butter, softened Or melted for brushing.
Optional Add-ins
- 1 cup Thinly sliced ham or turkey Optional.
- 1 cup Caramelized onions Optional.
- 1 cup Roasted garlic Optional.
- 1 cup Sliced tomatoes Optional.
- 1 cup Pickles Optional.
- 1 teaspoon Smoked paprika Optional.
Instructions
Preparation
- Preheat the oven to 350°F (175°C).
- Slice the Hawaiian rolls in half horizontally and place the bottom halves on a baking sheet lined with parchment.
- Butter the inside of each roll (the cut sides) with a thin, even layer.
- Place a slice of cheese on each buttered bottom half.
- Top with the other half of the roll, pressing lightly to set.
- Brush the tops with more butter.
Baking
- Bake for 10–12 minutes, or until the cheese is melty and the tops are golden brown.
- Remove from the oven and let cool for a minute before serving warm.