There’s something deeply comforting about a warm, crispy ball of seasoned stuffing—perfectly bite-sized, nostalgic, and made from leftovers that would otherwise be forgotten. Stuffing Balls take the best parts of holiday stuffing—herbs, savory bread, and sometimes sausage—and transform them into a handheld crowd-pleaser that’s equally at home on a holiday platter or as a cozy weeknight snack. Whether your kitchen smells like roasted turkey or you’re simply craving crunchy, cheesy comfort, these stuffing balls are worth trying this season. If you’re looking for inspiration or a twist on a classic, check out this thanksgiving stuffing balls idea to spark your creativity.
Why You’ll Love These Stuffing Balls
Stuffing Balls are:
- A brilliant way to repurpose leftover stuffing.
- Easy to customize with cheese, sausage, or vegetarian add-ins.
- Crispy on the outside and tender on the inside—ideal for dipping.
- Great for holiday spreads, appetizers, or family-style sides.
They’re simple to make, forgiving, and endlessly adaptable—perfect for home cooks who love from-scratch comfort food.
Ingredients & Equipment
Ingredients:
- 2 cups leftover stuffing
- 1 cup shredded cheese (e.g., cheddar or mozzarella)
- 1 egg
- 1/2 cup breadcrumbs
- Salt and pepper to taste
- Oil for frying
Notes:
- Leftover stuffing should be moist but not soggy. If it’s very dry, add a tablespoon or two of stock or beaten egg to bring it together.
- Use a bold cheese like sharp cheddar for extra flavor, or mozzarella for melty stretch.
- Breadcrumbs can be seasoned or plain; panko gives extra crunch.
Helpful equipment:
- Mixing bowl (large)
- Measuring cups and spoons
- Frying pan or deep skillet
- Slotted spoon or tongs
- Paper towels for draining
- Baking tray (if baking or roasting instead of frying)
- Thermometer (optional — oil temp around 350°F/175°C for frying)
- Food processor or blender (optional — to make finer breadcrumbs or to refresh stale bread)
If you want a hands-off variation, a baking tray and oven are all you need to roast these instead of frying. For step-by-step inspiration on classic stuffing preparations, see this best grandma’s stuffing recipe.
Step-by-Step Instructions (with tips)
Follow these clear, easy steps to make delicious stuffing balls. I’ve used the directions below as a base and added tips, variations, and flavor suggestions.
- In a bowl, combine the leftover stuffing, cheese, egg, salt, and pepper. Mix well until evenly combined.
- Tip: Use your hands (clean!) or a spoon to mix. The egg binds the mixture; if your stuffing feels too loose, add a tablespoon of breadcrumbs to firm it up. Taste for seasoning—leftover stuffing can sometimes be bland and benefits from a pinch more salt or a dash of poultry seasoning.
- Variation: Stir in cooked crumbled sausage, chopped cooked apples, or sautéed onions and mushrooms for extra flavor.
- Form the mixture into balls, about the size of a golf ball.
- Tip: Wet your hands slightly to prevent sticking. Make them uniform in size for even cooking. For appetizer portions, make them a little smaller; for hearty sides, keep them golf-ball size.
- Kitchen hack: Use a cookie scoop to portion the mixture for consistent results.
- Roll each ball in breadcrumbs to coat.
- Tip: Press the breadcrumbs gently into the surface to create a nice crust. Panko breadcrumbs give a light, flaky crunch, while seasoned breadcrumbs add instant flavor.
- Variation: For a cheesier crust, roll in a mixture of breadcrumbs and grated Parmesan.
- Heat oil in a frying pan over medium heat.
- Tip: Use a neutral oil with a high smoke point (vegetable, canola, or light olive oil). Aim for about 350°F (175°C) if using a thermometer. Add enough oil so the balls can brown evenly—about 1/8 to 1/4 inch in a skillet for shallow frying.
- Fry the stuffing balls until golden brown and crispy on the outside, about 3–4 minutes per side.
- Tip: Don’t overcrowd the pan; give each ball room so it browns rather than steams. Turn gently with tongs or a slotted spoon. If they’re browning too fast before heating through, lower the heat slightly.
- Remove from the oil and let drain on paper towels.
- Tip: A wire rack over a baking tray also works well to keep them crisp. If making a large batch, place finished balls in a warm oven (200°F / 95°C) while you finish frying to keep them hot and crisp.
- Serve warm and enjoy!
- Tip: Serve immediately with dipping sauces like cranberry mustard, gravy, or garlic aioli.
Alternative cooking methods:
- Roasting (oven-baked): Preheat oven to 400°F (200°C). Place breadcrumb-coated balls on a lightly oiled baking tray or a tray lined with parchment. Lightly spray or brush with oil and bake 15–20 minutes, turning halfway, until golden and heated through. This is a lower-fat option that still delivers great texture.
- Air-fryer: Cook at 375°F (190°C) for 10–12 minutes, shaking halfway, until golden and crisp.
- Boiling: Not recommended—boiling will make them soggy. If you want a softer dumpling-like texture, gently simmer in broth (like matzo balls) but call them stuffing dumplings rather than balls.
Flavor suggestions:
- Herb-forward: Add chopped parsley, sage, or rosemary.
- Spicy: Stir in a pinch of cayenne or chopped jalapeños.
- Sweet-savory: Mix in chopped dried cranberries and toasted pecans.
- Sausage-stuffed: Fold in crumbled cooked sausage for a heartier version.
Storage, Freezing & Make-Ahead Tips
Make-ahead:
- Prepare the mixture and shape the balls, then place them on a baking sheet lined with parchment and refrigerate for up to 24 hours before frying or baking. This helps them keep their shape.
- You can also fully fry or bake them in advance and reheat just before serving.
Refrigerating:
- Store cooked stuffing balls in an airtight container in the refrigerator for 3–4 days. Reheat in a 350°F (175°C) oven for 8–10 minutes to restore crispness.
Freezing:
- To freeze raw: Arrange shaped balls on a tray and freeze until solid (1–2 hours). Transfer to a freezer bag or airtight container and freeze up to 3 months. Cook from frozen—add a few extra minutes to frying or baking time.
- To freeze cooked: Freeze in a single layer on a tray until solid, then transfer to a bag. Reheat in a hot oven for best texture.
- Portioning advice: Freeze in meal-sized batches (e.g., 6–8 balls per bag) so you can defrost only what you need.
Thawing & reheating:
- Thaw overnight in the refrigerator for easiest reheating.
- Re-crisp in a hot oven, air fryer, or shallow fry for best results. Avoid microwaving unless you’ll finish in an oven or pan, because microwaves make the coating soggy.
For ideas on prepping stuffing ahead of time and turning leftovers into stars, see this helpful stuffing inspiration linked earlier.
How to Use / Serve This Dish
Stuffing Balls are versatile—consider these serving ideas and pairings:
Appetizers and party food:
- Serve on a platter with toothpicks and a few dipping bowls of gravy, cranberry sauce, or mustard-fig dip.
- Pair with a charcuterie board—cheese, sliced meats, and pickles complement the savory flavors.
As a side dish:
- Include them on a holiday plate alongside roasted turkey, green beans, and mashed potatoes.
- Serve with pan gravy poured over the top for a decadent, comforting bite.
For weeknight meals:
- Turn them into a sandwich filler: stuff warm balls into a soft roll with some cranberry relish and a drizzle of gravy.
- Add to a bowl with roasted vegetables and a drizzle of gravy for a rustic bowl meal.
Creative variations:
- Make mini stuffed centers: press a small cube of cheese or a cooked cranberry into the center before rolling and coating.
- Toss with a light vinaigrette and serve on a bed of peppery arugula for a contrast of textures.
- Use as a base for a stuffing-inspired casserole—layer cooked balls with veggies and a light sauce and bake.
For vegetarian or egg-free options, check out this creative gluten- and egg-free approach (note: external link is referenced here for inspiration, but for full instructions visit the Conclusion links below).
FAQ
Q: Can I make stuffing balls without an egg? A: Yes. The egg acts as a binder, but you can substitute a flax egg (1 tbsp ground flaxseed + 3 tbsp water, let sit 5 minutes) or 2–3 tablespoons of plain yogurt or mashed potato. Alternatively, chill the mixture well and use slightly more breadcrumbs to help with binding.
Q: How long do stuffing balls last in the fridge? A: Cooked stuffing balls keep well for 3–4 days in an airtight container. For longer storage, freeze them (see the freezing tips above).
Q: Can I use fresh stuffing instead of leftover stuffing? A: Absolutely. If making fresh, prepare your stuffing as usual and let it cool to room temperature so it binds better. Slightly drier stuffing is easier to form—if it’s too wet, add a tablespoon or two of breadcrumbs.
Q: Are there gluten-free options? A: Yes. Use gluten-free breadcrumbs or crushed gluten-free cereal/crackers for coating and ensure your stuffing base uses gluten-free bread. For egg-free, use the flax egg or other binder mentioned above.
Conclusion
Stuffing Balls turn the heartwarming flavors of homemade or leftover stuffing into a portable, crispy treat that’s perfect for seasonal gatherings and everyday comfort alike. They’re easy to tailor—cheesy, meaty, herb-forward, or vegetarian—and work beautifully as appetizers, sides, or snackable weeknight morsels. If you enjoyed this recipe, try comparing variations like Grandma Dot’s classic approach with this Grandma Dot’s Stuffing Balls Recipe, a gluten- and egg-free take at Stuffing Balls – The Dizzy Cook, or a hearty sausage-packed version at Sausage Stuffing Balls Recipe | The Kitchn. Give these a try this season, and if you make them, I’d love to hear how you customized them—share your favorite combo or photo!
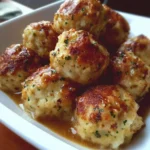
Stuffing Balls
Ingredients
Main Ingredients
- 2 cups leftover stuffing Should be moist but not soggy.
- 1 cup shredded cheese Cheddar or mozzarella works well.
- 1 large egg Acts as a binder.
- ½ cup breadcrumbs Panko gives extra crunch.
- to taste pinch salt
- to taste pinch pepper
For Frying
- as needed cups oil Neutral oil with a high smoke point.
Instructions
Preparation
- In a bowl, combine the leftover stuffing, cheese, egg, salt, and pepper. Mix well until evenly combined.
- Form the mixture into balls, about the size of a golf ball.
- Roll each ball in breadcrumbs to coat.
Cooking
- Heat oil in a frying pan over medium heat.
- Fry the stuffing balls until golden brown and crispy on the outside, about 3–4 minutes per side.
- Remove from the oil and let drain on paper towels.
- Serve warm and enjoy!