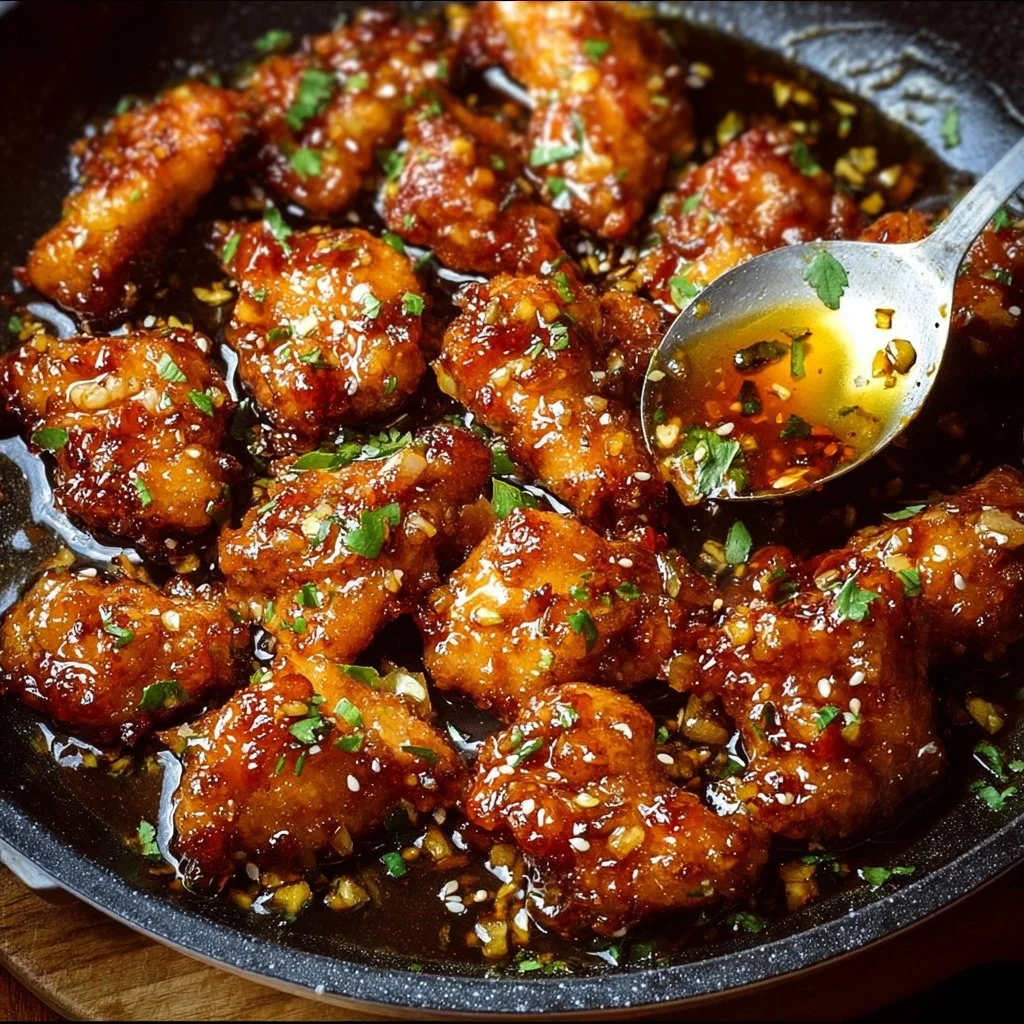
Honey Garlic Chicken is one of those comforting, weeknight-friendly dishes that feels both cozy and a little celebratory — a sweet-salty glaze clinging to tender chicken breasts, brightened by fresh garlic and finished with a glossy sheen. If you love dishes that marry sticky sweetness with a savory backbone, this recipe is worth trying: simple pantry ingredients, straightforward technique, and results that taste restaurant-inspired but home-cooked. The main ingredients — chicken breasts, honey, garlic, soy sauce, and olive oil — create a rich texture and balanced flavor that suits chilly evenings and warm spring dinners alike. If you’re exploring more garlic-forward chicken ideas, you might also enjoy a comforting bowl like aromatic ginger garlic chicken noodle soup.
Ingredients & Equipment
Ingredients
- 4 boneless, skinless chicken breasts (about 1 to 1.5 pounds total)
- 1/3 cup honey (use a mild or floral honey for best flavor)
- 4 cloves garlic, minced (about 1–2 tablespoons)
- 3 tablespoons soy sauce (low-sodium if preferred)
- 2 tablespoons olive oil (plus extra for the pan, if needed)
- Salt, to taste
- Freshly ground black pepper, to taste
- Optional garnish: sliced green onions or toasted sesame seeds
Equipment
- Large mixing bowl or measuring cup for the sauce
- Sharp knife and cutting board
- Heavy skillet (cast iron or stainless steel works well) or nonstick pan
- Tongs or spatula
- Meat thermometer (helpful to ensure doneness)
- Baking tray (if you prefer to finish in the oven) and aluminum foil
- Small whisk or fork
- Optional: blender or immersion blender to make a smoother sauce
Notes: This recipe is built around simple pantry staples. If you like extra heat, add a pinch of chili flakes or a dash of freshly ground white pepper. A thermometer helps hit the safe internal temperature of 74°C / 165°F without overcooking.
Step-by-Step Instructions (with tips)
Below are clear, easy-to-follow steps based on the directions you provided, with practical tips and variations to suit your kitchen style.
1. Make the honey garlic sauce
In a bowl, mix together the honey, minced garlic, soy sauce, and olive oil until well combined. Taste the mixture — it should be pleasantly sweet with a savory backbone. If you prefer a smoother, emulsified glaze, pulse the mixture for a few seconds in a blender or use an immersion blender. This helps the sauce cling to the chicken better when cooking.
Tip: If your honey is very thick, warm it gently in the microwave or in a small saucepan for a few seconds so it blends easily.
2. Season the chicken
Pat the chicken breasts dry with paper towels and season both sides with salt and freshly ground black pepper. Drying the surface helps the chicken brown more evenly and allows the sauce to adhere rather than run off.
3. Sear the chicken
Heat a skillet over medium heat and add a small amount of olive oil to coat the pan. When the oil shimmers, add the chicken breasts. Sear them undisturbed for about 3–4 minutes to develop a golden crust, then flip and sear the other side for another 3–4 minutes.
Tip: If the chicken breasts are very thick, consider pounding them to an even thickness (about 3/4 inch) so they cook uniformly. A cast iron skillet gives great browning; a nonstick pan is fine if you prefer easier cleanup.
4. Add the honey garlic sauce
Pour the honey garlic mixture over the seared chicken in the skillet, tilting the pan slightly to let the sauce pool and coat the chicken. Reduce the heat to medium-low to gently simmer the sauce without burning the honey.
Tip: Use a spoon or spatula to baste the chicken with the glaze every couple of minutes — this builds layers of sticky, caramelized flavor.
Variation: For a thicker glaze, after pouring the sauce into the pan, remove the chicken once it’s seared and simmer the sauce alone for a few minutes until it reduces and thickens, then return the chicken to coat. This gives a more lacquered finish.
5. Finish cooking
Cook for about 7–10 minutes on each side, or until the chicken is cooked through and the sauce thickens. Use a meat thermometer to check: insert into the thickest part and reach 165°F (74°C). If your chicken is seared quickly and the sauce is browning too much, lower the heat and cover the pan for a brief period to finish cooking more gently.
Oven finishing option: After searing both sides and adding the sauce, transfer the skillet (or move the chicken to a baking tray and spoon the sauce over) to a preheated oven at 375°F (190°C) and bake for 10–12 minutes depending on thickness. This method is great for meal prep or when cooking multiple breasts at once.
6. Serve immediately
Once cooked, let the chicken rest for 3–4 minutes so the juices redistribute. Spoon the sticky honey garlic sauce over the top and garnish with sliced green onions or toasted sesame seeds if you like. Serve hot.
Serving inspiration: For a noodle bowl twist, try placing the sliced chicken over steamed noodles and spooning extra glaze and broth or a splash of warm broth — a cozy variation inspired by ramen-style bowls like creamy garlic chicken ramen, where rich broths and garlic meld beautifully with tender chicken.
Variations & Flavor Suggestions
- Spicy honey garlic: Add 1/4–1/2 teaspoon chili flakes to the sauce or a small drizzle of a halal-friendly chili oil for an extra kick.
- Herb-forward: Stir in 1 teaspoon of chopped fresh thyme or rosemary to the sauce for an earthy note.
- Citrus brightening: Add 1 tablespoon of freshly squeezed lemon juice to the sauce just before serving to cut through the sweetness.
- Sesame touch: Add 1 teaspoon toasted sesame oil to the sauce for a nuttier dimension; sprinkle toasted sesame seeds when serving.
- For bone-in or skin-on chicken: Adjust cooking times and consider finishing in the oven until the internal temperature reaches safety margins.
Storage, Freezing & Make-Ahead Tips
Leftovers of honey garlic chicken keep well and can be a convenient, flavorful protein for quick lunches or weeknight dinners.
- Refrigerator storage: Cool the chicken to room temperature, then store in an airtight container for up to 3–4 days. Keep the sauce with the chicken to retain moisture.
- Freezing: For longer storage, freeze the cooked chicken (with sauce) in a freezer-safe container or resealable bag for up to 2–3 months. Portion into single-meal sizes for easy thawing.
- Thawing & reheating: Thaw overnight in the refrigerator, then reheat gently in a skillet over low heat, covered, to keep it from drying out. Add a splash of water or low-sodium broth if the sauce has thickened too much. You can also rewarm in the oven at 300°F (150°C) until heated through.
- Make-ahead: Prepare the honey garlic sauce and store separately in the fridge for up to 5 days. Marinate the chicken in a little of the sauce for 30 minutes to overnight (no more than 8–12 hours if using salt or soy), then cook as directed — marinating deepens flavor and saves hands-on time.
- Portioning: Store individual portions in meal prep containers with rice or vegetables to assemble quick meals. Add fresh garnish right before serving to keep textures bright.
How to Use / Serve This Dish
Honey Garlic Chicken is a versatile dish that adapts to many serving styles. Serve it over steamed rice for a classic comfort plate, slice it thinly for sandwiches or wraps, or toss it with roasted vegetables for a balanced skillet meal.
- Classic pairing: Steamed jasmine or basmati rice soaks up the sauce beautifully.
- Noodle bowls: Place sliced chicken over stir-fried or steamed noodles, with quick pickled cucumbers and a crisp vegetable like bok choy.
- Salad topping: Warm slices of honey garlic chicken are an excellent protein for a hearty grain salad with farro or quinoa, tossed greens, and a light vinaigrette.
- Family-style: Serve the whole pan at the table with a simple side of roasted root vegetables and a small green salad.
For more oven-baked or family-friendly chicken ideas that echo comforting flavors, try something like garlic parmesan chicken meatloaf as a hearty alternate main dish.
FAQ
Q: Can I use chicken thighs instead of chicken breasts?
A: Yes — boneless, skinless chicken thighs are a great alternative and tend to stay juicier. Reduce cooking time slightly if using thinner pieces, and ensure they reach an internal temperature of 165°F (74°C). Thighs can handle a bit more sauce reduction and often pair nicely with the sweet glaze.
Q: How can I prevent the honey from burning while cooking?
A: Honey can scorch if exposed to very high heat. Cook over medium to medium-low heat once the honey is added, and stir or baste often. If the sauce is thickening too quickly or darkening, lower the heat or add a splash of water or low-sodium broth to loosen it and continue cooking gently.
Q: What can I substitute for soy sauce if I need a lower-sodium or gluten-free option?
A: For lower sodium, use a reduced-sodium soy sauce. If you need a gluten-free swap, tamari is usually a safe choice — check labels to confirm it’s gluten-free. Coconut aminos can work too, offering a milder, slightly sweeter flavor, though you may want to reduce the added honey slightly to keep things balanced.
Q: How long will leftovers stay good in the refrigerator?
A: Store leftovers in an airtight container for 3–4 days. Reheat gently to avoid drying out the chicken, and always check for any off smells or textures before consuming.
Conclusion
Honey Garlic Chicken is a simple, comforting dish that transforms a handful of pantry staples into a sticky, savory-sweet meal perfect for family dinners, meal prep, or cozy seasonal evenings. The balance of honey and garlic with soy and olive oil gives you an approachable glaze that feels special without a lot of fuss. I hope you try this recipe soon — savor the aromas while it cooks, and feel free to adapt the spices and sides to make it your own. If you do make it, please share how it turned out or snap a photo for friends and family to enjoy this warm, homemade favorite.