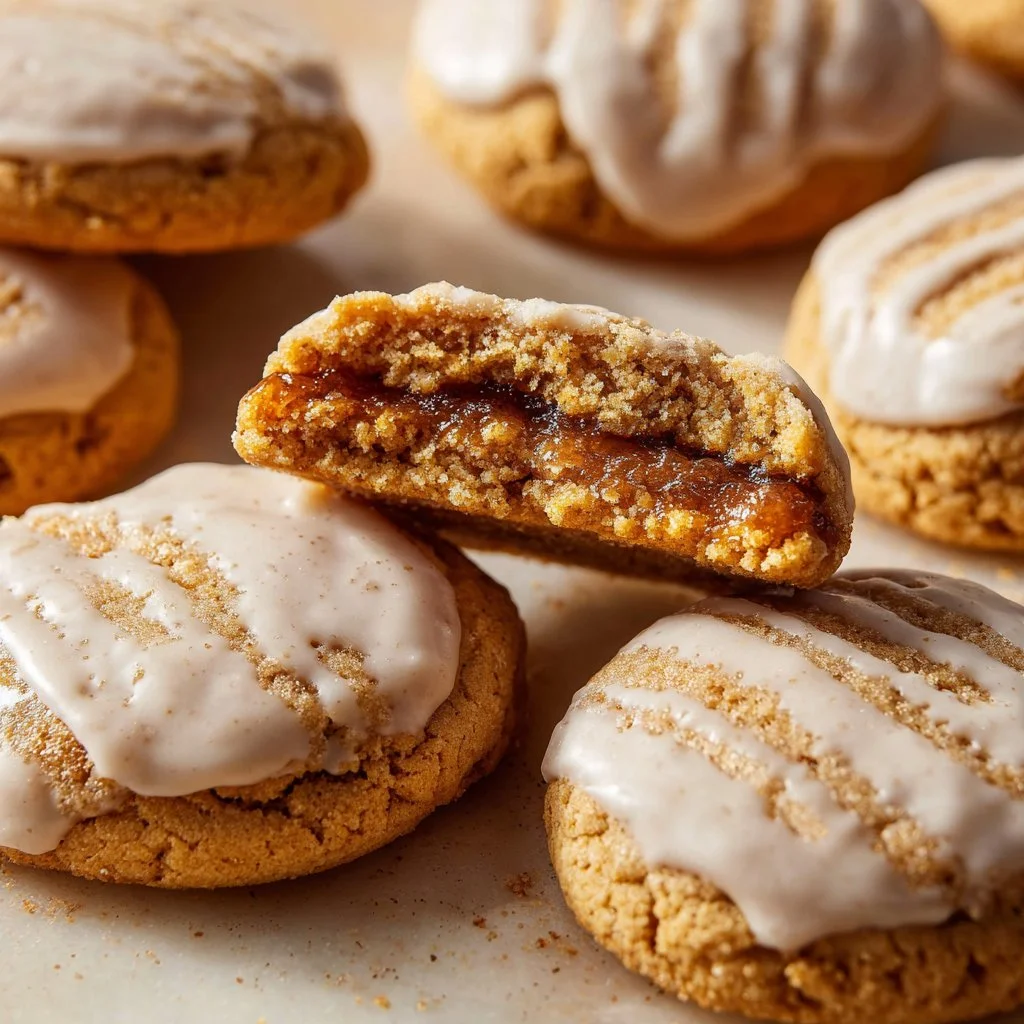
There’s something instantly nostalgic about a warm, cinnamon-kissed cookie that tastes like a childhood Pop-Tart, and these Brown Sugar Pop Tart Cookies capture that cozy comfort in every bite. Made with rich brown sugar, a touch of cinnamon, and a soft, buttery dough that envelopes a jammy, cinnamon filling, these cookies are perfect for crisp mornings, after-school snacks, or a homemade treat to share around the holidays. If you love retro sweets, you might also enjoy exploring how to make the best keto sugar cookies for a lower-carb spin on nostalgic flavors.
Ingredients & Equipment
Ingredients
- 1 cup brown sugar
- 1/2 cup granulated sugar
- 1 cup butter, softened
- 2 large eggs
- 1 teaspoon vanilla extract
- 3 cups all-purpose flour
- 1 teaspoon baking powder
- 1/2 teaspoon salt
- 1 tablespoon cinnamon
- 1 cup powdered sugar (for icing)
- 2 tablespoons milk (for icing)
- 1 teaspoon vanilla extract (for icing)
Notes on ingredients
- Brown sugar is the star here — its molasses content adds that warm, caramel-like flavor. You can use light or dark brown sugar; dark will be more robust.
- The cinnamon in the dough (1 tablespoon) gives a true “Pop-Tart” vibe; adjust to taste if you prefer milder spice.
- For filling, use your favorite jam (strawberry, raspberry, or apple butter are excellent), or make a quick cinnamon-sugar brown butter filling by mixing browned butter with brown sugar and cinnamon.
- For the icing, powdered sugar mixed with milk and vanilla gives a simple glaze; add a pinch of cinnamon or a drop of maple extract for a seasonal twist.
Equipment (helpful tools)
- Large mixing bowl and medium bowl (or a stand mixer with paddle attachment)
- Measuring cups and spoons
- Rolling pin and cookie cutters or a sharp knife to cut rectangles
- Baking tray(s) lined with parchment paper or silicone baking mat
- Fork for sealing edges
- Spatula and cooling rack
- Small bowl and whisk for icing
- Optional: pastry brush, food-safe thermometer for butter temperature, bench scraper
If you like experiment-driven baking, a stand mixer speeds up creaming the butter and sugars, but you can do this by hand with a sturdy spoon. A silicone mat helps prevent sticking and promotes even browning.
Step-by-Step Instructions (with tips)
- Preheat the oven to 350°F (175°C). Line baking trays with parchment paper or a silicone baking mat. Allow the softened butter to sit at room temperature so it creams easily.
- In a large bowl, cream together the brown sugar, granulated sugar, and softened butter until smooth. Tip: If using a mixer, start on low to combine, then bring up to medium speed for about 2–3 minutes until light and fluffy. Scrape down the sides of the bowl as needed.
- Beat in the eggs and vanilla extract until well combined. Make sure each egg is fully incorporated before adding the next. This helps the dough emulsify and gives a tender crumb.
- In another bowl, whisk together the flour, baking powder, salt, and cinnamon. Gradually add the dry ingredients to the wet mixture, mixing until just combined. Tip: Avoid overmixing — stop when you no longer see streaks of flour. Overworked dough becomes tough.
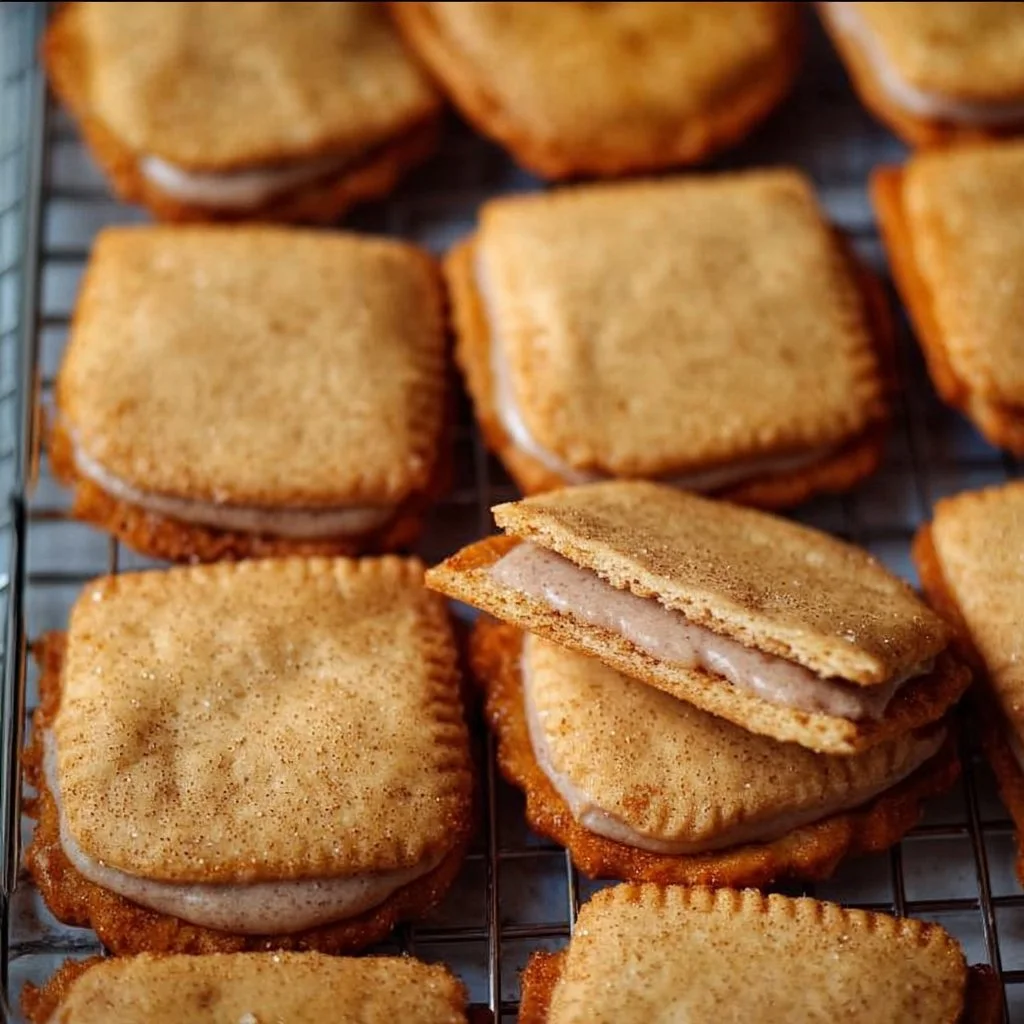
- Roll out the dough on a floured surface and cut into rectangles. Aim for uniform sizes so they bake evenly. A good size is about 3 inches by 2 inches for classic cookie-pop tart shapes. If the dough is too soft to roll, chill it in the refrigerator for 20–30 minutes.
- Place a spoonful of the filling in the center of half the rectangles, then top with the remaining rectangles. Leave a small border so you can seal the edges. For jam-based fillings, use 1/2 to 1 teaspoon per cookie; for thicker fillings (like pie filling or nut-based mixtures), use a slightly smaller amount to prevent overfill.
- Seal the edges with a fork. Press down firmly but gently to ensure a tight seal — this prevents filling from leaking out while baking. Make a small vent or two with the fork tines so steam can escape.
- Bake for 12–15 minutes until golden brown. Rotate the trays halfway through baking if your oven has hot spots. The cookies should be lightly golden at the edges and set on top. Tip: If you want crispier edges, bake an extra minute or two; for softer cookies, watch closely and remove as soon as they have color.
- For the icing, mix powdered sugar, milk, and vanilla extract until smooth. Drizzle over cooled cookies. If the icing is too thin, add more powdered sugar; if too thick, add milk a few drops at a time. You can also pipe the icing for a more vintage Pop-Tart look. Mix in a pinch of cinnamon or a drop of maple extract for seasonal variation.
- Enjoy your throwback cookies! These taste best after the icing has set for 10–15 minutes.
Variations and flavor suggestions
- Jam filling: classic strawberry or raspberry is nostalgic; try apricot or peach in late summer for seasonal fruit flavor.
- Nutty twist: chop pecans and fold into a brown-butter cinnamon filling for texture. If you want inspiration for nut-forward cookies, check variations like Crumbl pecan pie cookies.
- Spiced apple filling: roast or sauté diced apples with a bit of brown sugar and cinnamon (roasting brings out deeper flavor; simmering/boiling down makes a softer compote). Both methods work — roasting concentrates sugars and adds caramel notes, while simmering gives a more uniform saucy texture.
- Glaze options: swap milk for heavy cream for a richer icing, or add lemon zest for a bright contrast. For an autumnal spin, try maple extract and chopped toasted walnuts on top.
Storage, Freezing & Make-Ahead Tips
Storing leftovers
- Room temperature: Keep cookies in an airtight container at room temperature for up to 3 days. Place a sheet of parchment between layers to protect the icing.
- Refrigeration: To keep the filling especially fresh (if it’s a fruit filling), refrigerate in a single layer or with parchment sheets for up to 7 days. Allow chilled cookies to come to room temperature before serving for best texture.
Freezing
- Unbaked dough: Portion the dough into flattened discs or roll it between parchment sheets and freeze for up to 3 months. Thaw in the refrigerator overnight before rolling and assembling. This makes weekday baking quick and satisfying.
- Assembled unbaked cookies: You can assemble the rectangles and freeze them on a tray until firm, then transfer to a freezer bag. Bake directly from frozen; add a couple of extra minutes to the baking time.
- Baked cookies: Freeze fully cooled, uniced cookies in a single layer until firm, then stack with parchment between layers in a freezer-safe container for up to 3 months. Thaw at room temperature and then ice just prior to serving.
Make-ahead tips
- Fillings can be prepared up to a week ahead and refrigerated (jam, compote, brown-butter filling).
- Pre-roll dough and freeze between parchment layers so you can quickly cut shapes when guests arrive.
- The icing is best made the day of serving, but powdered sugar can be pre-measured to speed things up.
Portioning advice
- For gatherings, plan on 2–3 cookies per person as a dessert accompaniment, or more if they’re the main sweet item. Smaller rectangles yield more cookies and are ideal for party platters.
How to Use / Serve This Dish
Serving ideas
- Breakfast or brunch: Serve warm with coffee, tea, or a cinnamon latte. For a savory-sweet brunch spread, pair with eggs, yogurt, and a side like healthy sweet potato hash browns for contrast.
- Dessert platter: Arrange with fresh fruit, roasted nuts, and a small pot of extra jam for dunking.
- Gift jars: Stack a few cookies in a decorative box or cellophane for neighborly gifts during the holidays. They travel well if kept in a rigid container.
Creative variations for serving
- Warm, sliced and topped: Split a fresh-baked cookie and toast it lightly, then top with a scoop of vanilla ice cream and drizzle of caramel for a grown-up dessert.
- Ice-cream sandwich: Use two smaller rectangles with a scoop of softened ice cream in between, then roll the edges in chopped nuts or cookie crumbs for a fun treat.
- Party bites: Cut the rectangles into smaller squares, drizzle with colorful icing, and sprinkle with festive nonpareils for a thematic event.
FAQ
Q: Can I substitute the flour for a gluten-free blend?
A: Yes, you can usually swap a 1:1 gluten-free all-purpose flour blend that contains xanthan gum. Texture might be slightly different — chill the dough a bit longer if it seems sticky, and consider baking a test cookie to adjust time.
Q: How long do these cookies stay fresh?
A: At room temperature in an airtight container, they keep well for about 3 days. In the fridge, they’ll hold up for about a week. Freeze for longer storage up to 3 months.
Q: What if my filling leaks during baking?
A: To avoid leaks, use less filling (about 1/2 teaspoon for small rectangles), press and seal edges firmly with a fork, and vent the top. If using a very runny jam, consider simmering it briefly to thicken or using a thicker fruit butter.
Q: Can I make these ahead for a big event?
A: Absolutely. Freeze assembled unbaked cookies the day before; bake from frozen and ice right after they cool for a fresh-out-of-the-oven experience with less day-of work.
Conclusion
Brown Sugar Pop Tart Cookies are a simple, heartwarming way to bring retro charm to your kitchen — buttery dough, brown-sugar depth, cinnamon warmth, and a sweet glaze make them both comforting and irresistibly shareable. If you’re looking for inspiration or another baker’s take on this idea, check out this delightful version of Frosted Brown Sugar Cinnamon Pop Tart Cookies, or this lovely adaptation at Frosted Brown Sugar Pop Tart Cookies – Fresh April Flours for more techniques and presentation ideas. I’d love to hear how your batch turns out — try the recipe, share a photo, and pass the comfort along to someone who’d appreciate a homemade treat.
Brown Sugar Pop Tart Cookies
Ingredients
Main ingredients
- 1 cup brown sugar Can use light or dark brown sugar; dark will be more robust.
- ½ cup granulated sugar
- 1 cup butter, softened Allow to soften at room temperature.
- 2 large eggs Make sure each egg is well incorporated before adding the next.
- 1 teaspoon vanilla extract
- 3 cups all-purpose flour Avoid overworking the dough.
- 1 teaspoon baking powder
- ½ teaspoon salt
- 1 tablespoon cinnamon Adjust to taste for spice.
Icing ingredients
- 1 cup powdered sugar For icing.
- 2 tablespoons milk For icing.
- 1 teaspoon vanilla extract For icing.
Instructions
Preparation
- Preheat the oven to 350°F (175°C) and line baking trays with parchment paper or a silicone baking mat.
- In a large bowl, cream together brown sugar, granulated sugar, and softened butter until smooth.
- Beat in the eggs and vanilla extract until well combined.
- In another bowl, whisk together flour, baking powder, salt, and cinnamon, then gradually add to the wet mixture.
- Roll out the dough on a floured surface and cut into rectangles, aiming for uniform sizes.
Assembly
- Place a spoonful of filling in the center of half the rectangles and top with the remaining rectangles.
- Seal the edges with a fork and make a few small vents for steam.
Baking
- Bake for 12–15 minutes until golden brown, adding extra time for crispier cookies.
- Let cool before icing.
Icing
- Mix powdered sugar, milk, and vanilla extract until smooth, then drizzle over cooled cookies.