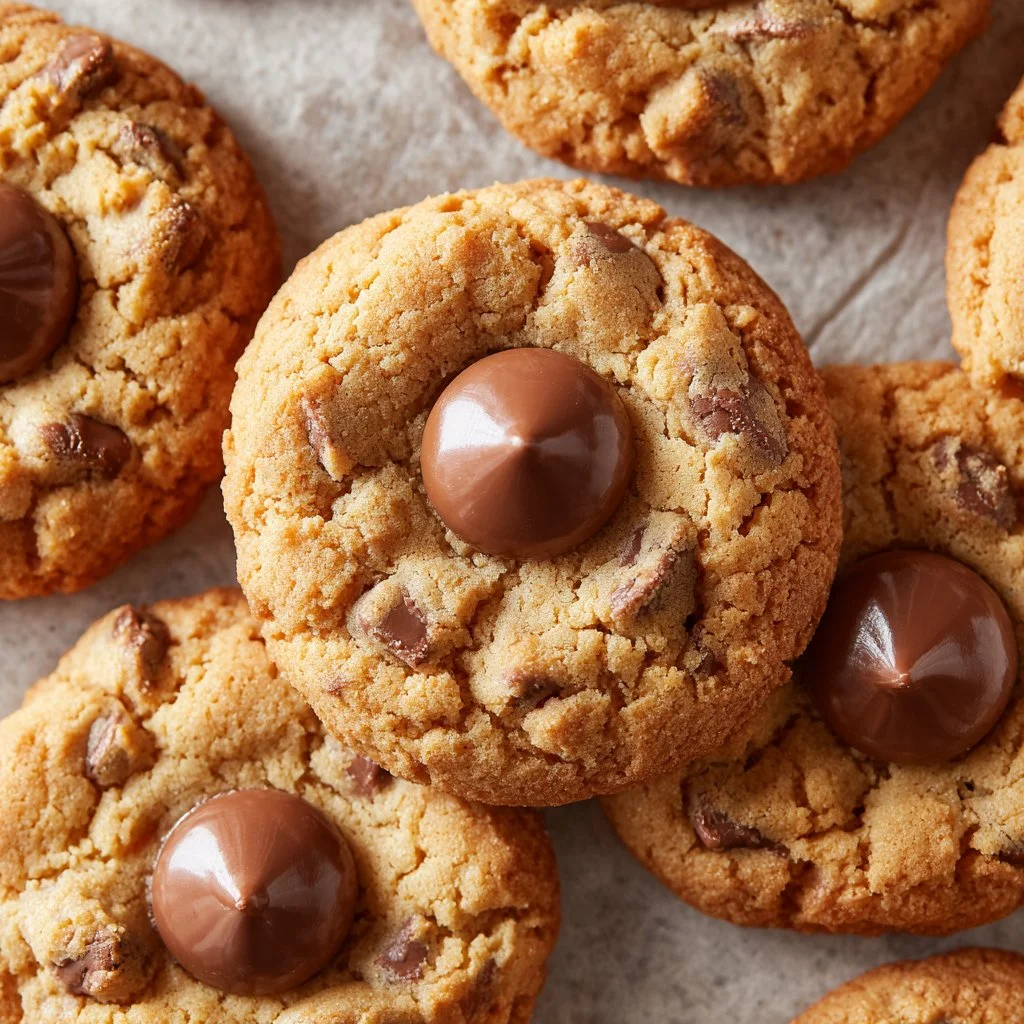
Classic Peanut Butter Blossoms
Classic Peanut Butter Blossoms are the cozy, chocolate-topped peanut butter cookies that everyone remembers from holiday platters and school bake sales. If you love the warm, nutty taste of peanut butter paired with a melty Hershey’s Kiss, this recipe is a must-try: it combines creamy peanut butter, tender, slightly chewy cookie centers, and crackly edges that make every bite satisfyingly textured. These cookies are perfect for holiday cookie exchanges, cozy winter afternoons with a cup of tea, or any time you want a nostalgic, from-scratch treat. Before we dive in, if you’re also planning a full seasonal menu, you might like a comforting soup to start—try this hearty option while your cookies chill: butter bean soup.
Ingredients & Equipment
Ingredients
- 1 3/4 cup All-Purpose Flour
- 1 tsp Baking Soda
- 1/2 tsp Salt
- 1/2 cup Creamy Peanut Butter
- 1/2 cup Unsalted Butter (room temperature)
- 1/2 cup Granulated Sugar
- 1/2 cup Light Brown Sugar (lightly packed)
- 1 Large Egg
- 2 tbsp Milk
- 1 tsp Vanilla Extract
- 1/2 cup Granulated Sugar (additional amount for coating cookies)
- 11 oz Bag of Hershey Kisses
Notes
- Use creamy peanut butter for the classic texture; natural peanut butter can be used but may affect spread and texture (see FAQ for swaps).
- The additional 1/2 cup granulated sugar is for rolling the cookie balls before baking to give that twinkling, slightly crisp exterior.
- Hershey Kisses melt best when gently pressed into the hot cookie straight from the oven; unwrap a few more than you think you need in case a few break.
Equipment
- Medium mixing bowl for dry ingredients
- Stand mixer with paddle attachment or hand mixer (a whisk and elbow grease also work)
- Rubber spatula for scraping the bowl
- Measuring cups and spoons (accurate measuring ensures consistent cookies)
- Baking sheets (two at minimum)
- Parchment paper or silicone baking mats
- Cookie scoop or tablespoon for shaping 1-inch balls
- Cooling rack
- Airtight container for storage
- Optional helpful tools: kitchen scale (for precision), dough chill container, silicone spatula, oven thermometer to verify accurate oven temp
If you plan to make your own peanut butter from peanuts, you’ll want a food processor or high-speed blender and a baking sheet to roast peanuts. (There’s a small but useful flavor decision here — more on roasting vs boiling under Tips.)
Step-by-Step Instructions (with tips)
H2: Preparation
- In a medium bowl, whisk together the all-purpose flour, baking soda, and salt. Set aside.
- Tip: Whisking distributes the leavening evenly so your cookies rise uniformly.
H2: Make the Dough
2. Using a hand mixer or stand mixer fitted with paddle attachment, cream together the peanut butter, unsalted butter, granulated sugar, and light brown sugar on medium-high speed until well blended.
- Tip: Scrape the bowl once or twice so everything mixes evenly. Creaming until light and fluffy (about 2–3 minutes) gives a lighter texture.
-
Add in the egg, milk, and vanilla extract. Scrape down the sides of the bowl as needed.
- Tip: Room-temperature egg and butter help the dough come together smoothly. If your dough seems thick, add the extra tablespoon of milk (or a splash more) sparingly.
-
Reduce the mixer speed, gradually adding in the dry mixture until completely blended.
- Tip: Don’t overmix once the flour is added — stop as soon as you don’t see streaks of flour to avoid tough cookies.
H2: Chill
5. Place the cookie dough in a well sealed food container or tightly wrap the top of the mixing bowl with plastic wrap (or alternative) and chill the cookie dough for a minimum of 1 hour.
- Tip: Chilling solidifies the fats and prevents excessive spreading in the oven, which keeps the centers soft and the edges crackly. You can chill up to 48 hours; if chilling longer, let the dough rest at room temperature 10–15 minutes before scooping.
H2: Shape, Sugar, and Bake
6. After dough has chilled, line 2 baking sheets with parchment paper or silicone mats, adjust the oven rack to the 2nd level mark (just above center), and preheat the oven to 375°F.
- Quick oven note: If your oven runs hot or cool, use an oven thermometer to confirm accuracy.
-
Using a spoon and your clean hands (or a cookie scoop), shape the cookie dough into 1-inch balls, roll in granulated sugar, and place about 1 1/2 – 2 inches apart on lined baking sheets.
- Tip: A small cookie scoop gives consistent size; rolling in sugar right before baking creates that classic, twinkly exterior.
-
Bake for 7–8 minutes, then remove from oven and place a milk chocolate kiss on each cookie, pressing down gently to create the crackly cookie edges.
- Tip: Press straight down in the center and the cookie will naturally crack around the edge. If a Kiss breaks, set it aside and use another.
-
Return to the oven and bake for 2 minutes longer.
- Tip: This second short bake sets the chocolate just enough so it adheres without fully melting away.
-
Cool cookies on baking sheet for 5–10 minutes before transferring to a cooling rack to cool completely.
- Tip: Letting cookies set a bit on the pan prevents the chocolate from sliding and helps them firm up.
-
Store cookies in an airtight container with a slice of bread for up to a week.
- Tip: The bread keeps the cookies soft by adding moisture; replace bread every couple of days.
H3: Variations & Flavor Suggestions
- Chocolate type: Swap Hershey Kisses for dark chocolate squares or peppermint Kisses during the holidays for a festive twist.
- Size: Make mini cookies by forming 3/4-inch balls; reduce baking time by about 2 minutes. For larger cookies, increase bake time slightly and press a larger chocolate piece in the center.
- Peanut butter choices: Creamy peanut butter preserves the traditional texture. If you prefer a more pronounced roast flavor, make peanut butter from roasted peanuts. If you’re curious about making peanut butter from scratch, roasting peanuts intensifies flavor and reduces moisture; boiling peanuts is an entirely different preparation (boiled peanuts are soft and salty — delicious on their own, but not ideal for cookie butter).
- Add-ins: Stir in 1/2 cup mini chocolate chips or chopped roasted peanuts for extra crunch. You can also sprinkle flaky sea salt atop each Kiss for a salted-chocolate contrast.
H3: Kitchen Tips
- Preventing flat cookies: Be sure dough is chilled and your measuring of flour is accurate. Too little flour causes over-spread.
- Soft & chewy vs crisp: For chewier cookies, bake on a silicone mat; for crisper bottoms, use a dark metal sheet and bake a minute or two longer.
- Melting control: If your kitchen is hot, place the baking sheet on a cooling rack or a cool surface before pressing the Kisses in to avoid excessive melting.
For a side dish at your cookie party or holiday table, these cookies go nicely with simple sides like this creamy corn casserole or fun stuffing balls—consider pairing them with a savory offering such as classic creamy corn casserole or easy stuffing balls if you’re prepping a full spread.
Storage, Freezing & Make-Ahead Tips
Storing baked cookies
- Room temperature: Cool completely, then layer between parchment in an airtight container with a slice of bread for up to 7 days. Replace the bread after 2–3 days.
- Refrigeration: Not necessary and can dry cookies out — only refrigerate if your home is extremely warm or if you’ve added perishable fillings.
Freezing options
- Freeze baked cookies: Flash-freeze on a tray, then transfer to a freezer-safe bag or container. They keep well for up to 3 months. Thaw at room temperature for 30–60 minutes before serving.
- Freeze dough balls: Scoop and roll dough into sugar, then flash-freeze on a tray and store in a sealed bag. Bake from frozen — add 1–2 minutes to the initial bake time. This is a great make-ahead strategy during busy holiday seasons.
Make-ahead strategy
- Prepare dough up to 48 hours ahead and keep it chilled in the fridge, or freeze shaped dough balls as above and bake the day you want fresh cookies.
- If baking a large batch for a gathering, bake ahead and freeze fully baked cookies; they also thaw quickly for same-day service.
How to Use / Serve This Dish
Serving ideas
- Classic platter: Arrange on a cookie tray alongside other holiday favorites and garnish with sprigs of fresh rosemary or cranberries for color.
- Gift jars: Stack a dozen cookies in a clear cellophane bag with ribbon for homemade gifts. Include a small notecard that they’ll taste best at room temperature.
- Dessert board: Add these to a dessert grazing board with shortbread, spiced nuts, fruit, and cheeses for grown-up holiday entertaining.
- Warm variation: Gently warm a cookie for 5-7 seconds in the microwave (short bursts) for an extra soft center and gooey Kiss.
Pairings
- Beverages: Serve with cold milk, hot cocoa, coffee, or a nutty chai latte. The rich peanut butter pairs particularly well with milk for kids and coffee for adults.
- Savory pairings: Offer alongside warm soups or roasts for a sweet finish—if your holiday table includes a roast breast, these cookies are a charming dessert for after a savory main like this slow-roasted option: butterball turkey breast roast.
Creative uses
- Thumbprint upgrade: After the first bake, press a small indentation in the center, add a teaspoon of peanut butter cup filling or jam, and return to oven just to set.
- Ice cream sandwich: Use two cookies to sandwich a scoop of vanilla or chocolate ice cream; freeze briefly to set.
FAQ
Q: Can I use natural peanut butter or crunchy peanut butter?
A: Yes, but be aware natural peanut butter (oil-separated) can make dough looser and cookies flatter; you may need to chill longer or add 1–2 tbsp more flour. Crunchy peanut butter will add texture from peanut bits, which is delicious but changes the classic smooth interior.
Q: How long do these cookies last?
A: Stored in an airtight container at room temperature with a slice of bread, they remain soft for up to 7 days. Baked and frozen, they keep up to 3 months.
Q: Can I make these gluten-free?
A: Substitute a 1:1 gluten-free all-purpose flour blend that contains xanthan gum. Baking behavior can vary by blend, so chill dough well and monitor bake times.
Q: Why did my kisses sink or slide off?
A: Sinking or sliding usually happens if you press the Kiss too early (before the bottom has set) or if you use chocolates that fully melt. Press the Kiss into the cookie when it comes out of the oven hot and soft, then bake the extra 2 minutes so some of the Kiss adheres. If your kitchen is very warm, let the cookie cool for 30–60 seconds before placing the Kiss.
Conclusion
These Classic Peanut Butter Blossoms are a timeless comfort cookie—soft, peanutty centers edged with delicate cracks and crowned with a glossy chocolate Kiss. They capture that holiday nostalgia while being simple enough for weekday baking and flexible enough for creative tweaks. If you’d like more recipe inspiration or variations, check out this trusted take on the classic from Classic Peanut Butter Blossoms – Sally’s Baking, another home-style version at Classic Peanut Butter Blossoms – Beyond the Butter, a classic family-tested recipe at Classic Peanut Butter Blossom Cookies Recipe – BettyCrocker.com, and a soft-and-chewy variation at The BEST Peanut Butter Blossoms (Soft and Chewy!) | Mom On …. I hope you bake a batch, savor that warm, peanut-butter goodness, and share these with people you love—then come back and tell me how yours turned out!

Classic Peanut Butter Blossoms
Ingredients
Dry Ingredients
- 1 ¾ cup All-Purpose Flour
- 1 tsp Baking Soda
- ½ tsp Salt
Wet Ingredients
- ½ cup Creamy Peanut Butter Use creamy peanut butter for the classic texture.
- ½ cup Unsalted Butter Room temperature.
- ½ cup Granulated Sugar
- ½ cup Light Brown Sugar Lightly packed.
- 1 Large Egg Room temperature.
- 2 tbsp Milk Add more if the dough seems thick.
- 1 tsp Vanilla Extract
- ½ cup Granulated Sugar (additional) For coating cookies.
Chocolate
- 11 oz Bag of Hershey Kisses Unwrap a few more than you think you need.
Instructions
Preparation
- In a medium bowl, whisk together the all-purpose flour, baking soda, and salt. Set aside.
Make the Dough
- Using a hand mixer or stand mixer fitted with paddle attachment, cream together the peanut butter, unsalted butter, granulated sugar, and light brown sugar on medium-high speed until well blended.
- Add in the egg, milk, and vanilla extract. Scrape down the sides of the bowl as needed.
- Reduce the mixer speed, gradually adding in the dry mixture until completely blended.
Chill
- Place the cookie dough in a well-sealed food container or tightly wrap the bowl and chill for a minimum of 1 hour.
Shape, Sugar, and Bake
- After dough has chilled, line baking sheets with parchment paper or silicone mats, adjust the oven rack to the 2nd level mark, and preheat the oven to 375°F.
- Using a spoon or cookie scoop, shape the dough into 1-inch balls, roll in granulated sugar, and place about 1 1/2 to 2 inches apart on lined baking sheets.
- Bake for 7-8 minutes, then place a Hershey Kiss on each cookie, pressing down gently.
- Return to the oven and bake for 2 minutes longer.
- Cool cookies on the baking sheet for 5-10 minutes before transferring them to a cooling rack.