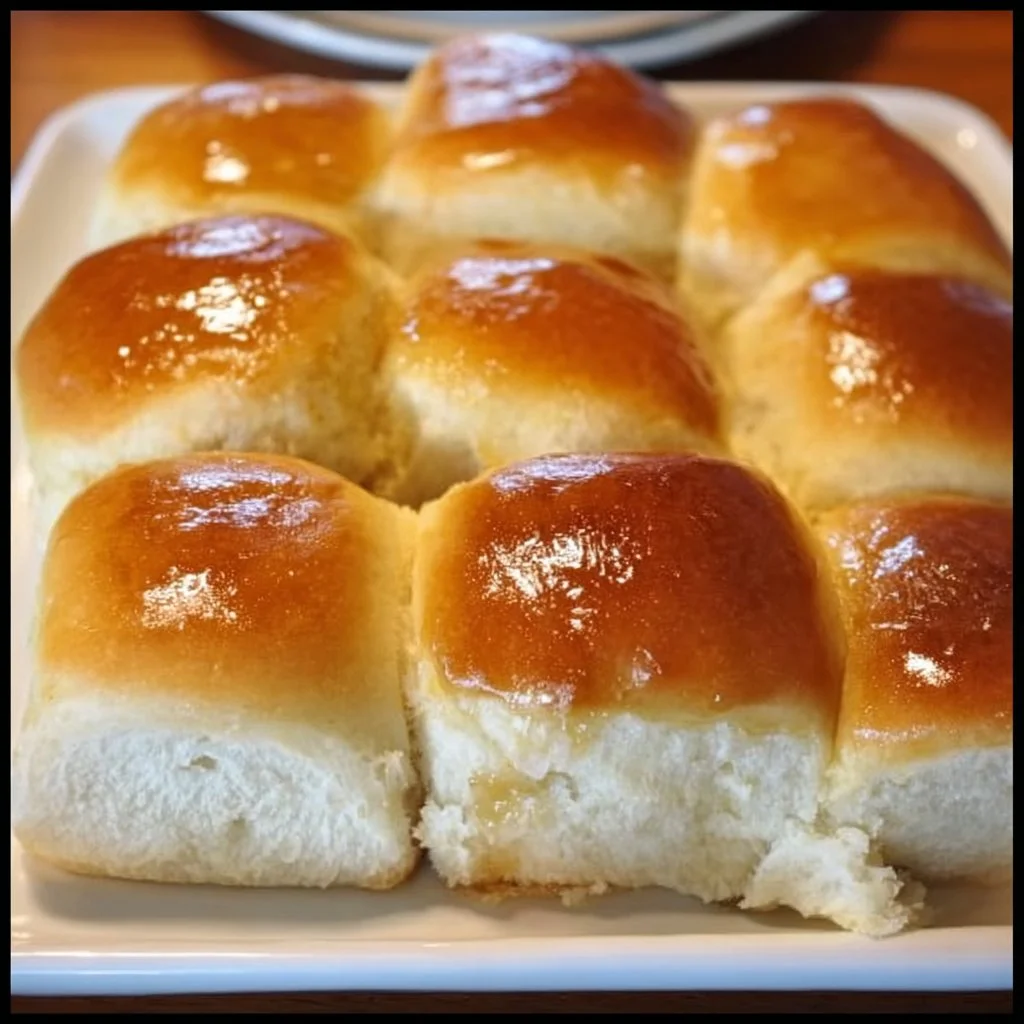
There’s something irresistibly warm about tearing into a pillowy, buttery roll straight from the oven — and Texas Roadhouse Rolls deliver exactly that kind of comfort. Whether you’re baking for a cozy fall dinner, a holiday table, or simply craving a batch of soft, golden rolls, this homemade copycat brings that restaurant-style magic to your kitchen. The main players here are a tender, enriched dough made with milk, butter, and eggs, and a generous brush of melted butter that gives each roll its signature shine and flavor. If you love hearty mains like a slow-simmered stew, these rolls are the perfect companion — try serving them alongside a rich Texas Cowboy Stew for an extra-homestyle meal.
Ingredients & Equipment
Ingredients
- 4 cups all-purpose flour
- 1/4 cup granulated sugar
- 1 tablespoon active dry yeast
- 1 teaspoon salt
- 1 cup milk, warmed
- 1/2 cup unsalted butter, melted
- 2 large eggs
- Additional butter for brushing
Notes
- Use whole milk for the best richness; 2% works in a pinch.
- Make sure your milk is warm (about 105–115°F / 40–46°C) to activate the yeast without killing it.
- If your butter is salted, reduce added salt slightly to taste.
Helpful tools
- Large mixing bowl (or stand mixer bowl)
- Stand mixer with dough hook (optional) or sturdy wooden spoon
- Baking tray or rimmed sheet pan lined with parchment paper
- Kitchen thermometer (for checking milk temperature)
- Pastry brush for butter
- Measuring cups and spoons
- Bench scraper or knife for dividing dough
If you like quick clean-up and fine texture, a stand mixer with a dough hook is wonderful, but you can also mix and knead by hand for the same homestyle satisfaction.
Step-by-Step Instructions (with tips)
Below is an easy, reliable method that follows the classic steps. Read through before you start so your kitchen rhythm flows smoothly.
- Activate the yeast
- In a mixing bowl, combine the warmed milk, granulated sugar, and active dry yeast. Stir gently and let it sit until frothy, about 5–10 minutes.
- Tip: If the mixture doesn’t become frothy within 10 minutes, your yeast may be old or the milk too hot/cold. Try again with fresh yeast and ensure the liquid is within the 105–115°F range.
- Combine wet and dry ingredients
- Add the melted butter and the two large eggs to the frothy yeast mixture. Stir to combine.
- Add the salt and about half of the flour, mixing until a shaggy dough forms. Gradually add the remaining flour until the dough starts to pull away from the sides of the bowl.
- Tip: Use a stand mixer with a dough hook on low speed for 3–4 minutes, or mix by hand and then knead on a lightly floured surface.
- Knead until smooth
- Knead the dough until it becomes smooth and elastic. If using a mixer, knead 5–7 minutes; by hand, knead 8–10 minutes.
- Tip: The dough should be slightly tacky but not sticky. Add a teaspoon of flour at a time if it’s too sticky, or a light mist of water if too dry.
- First rise
- Place the dough in a greased bowl, turning it to coat the surface. Cover with plastic wrap or a clean towel and let it rise in a warm, draft-free spot until doubled in size, about 1 hour.
- Tip: A slightly warm oven (turned off) with the oven light on is an excellent proofing spot.
- Shape the rolls
- Punch down the dough to release air. Divide into equal pieces — for dinner-roll size, 12–16 pieces works well. Shape each piece into a snug ball and place them on a parchment-lined baking sheet, snug but not squashed.
- Tip: For uniform rolls, use a kitchen scale and portion about 60–75 grams per roll.
- Second rise
- Cover the shaped rolls loosely with a towel or plastic wrap and let rise another 30 minutes until puffy.
- Tip: This second rise builds tenderness and helps the rolls bake up evenly.
- Preheat the oven
- Preheat the oven to 350°F (175°C). Place a shallow pan filled with hot water on the lower rack if you want extra steam in the oven (see variations below).
- Bake and finish
- Bake the rolls for 15–20 minutes, until the tops are golden brown. Remove from the oven and immediately brush generously with melted butter before serving.
- Tip: For a shiny, golden top, mix a tablespoon of milk with a beaten egg and brush gently before baking (egg wash). If you prefer softer tops, skip the egg wash and do the post-bake butter brush.
Variations and flavor suggestions
- Honey Butter Rolls: Mix 2 tablespoons honey into the melted butter and brush on warm rolls for a touch of sweetness.
- Garlic Herb Rolls: Add 1–2 teaspoons minced garlic and a tablespoon of chopped fresh herbs (parsley, chives) to the melted butter and brush before serving.
- Dinner sliders: Make smaller rolls (about 1 oz each) for slider buns ideal for mini sandwiches.
- Texture play: For a more rustic crust, bake the rolls on a preheated baking stone without added steam. To mimic a softer, ultra-tender roll, introduce steam by placing a shallow pan of hot water in the oven for the first 8–10 minutes of baking. Unlike roasting meats or boiling vegetables, breads respond mainly to dry heat, but controlled steam during the initial bake softens the crust and creates springier rolls.
Kitchen tips
- Don’t over-flour your surface; a slightly tacky dough produces the best crumb.
- Let the rolls cool for 5–10 minutes before slicing so the interior sets but serve warm for maximum enjoyment.
- If you’re short on time, you can do a single long rise in the refrigerator overnight (slow proof). Shape the rolls in the morning and let them come to room temperature while the oven preheats.
Pairing idea: These rolls are great alongside stews and hearty soups — the soaking-up ability is part of the charm.
Storage, Freezing & Make-Ahead Tips
Storing leftovers
- Room temperature: Store baked rolls in an airtight container or a resealable plastic bag at room temperature for up to 2 days. Add a small piece of paper towel to absorb excess moisture and keep them from becoming soggy.
- Refrigerator: You can refrigerate up to 5 days, but refrigeration may dry them slightly. Warm briefly in the oven or microwave with a damp paper towel before serving.
Freezing
- To freeze baked rolls: Cool completely, then wrap the whole batch tightly in plastic wrap and foil, or place individual rolls in freezer bags. Freeze up to 3 months.
- To thaw: Transfer to the refrigerator overnight, then warm in a 300°F (150°C) oven for 8–10 minutes or microwave for 20–30 seconds.
- To freeze unbaked/partially proofed rolls (make-ahead): Shape the rolls on the baking sheet and flash-freeze until firm (about 1 hour). Transfer to freezer bags. When ready to bake, place frozen rolls on the sheet, allow to thaw and proof in a warm spot for 30–60 minutes, then bake as directed.
Portioning advice
- For parties: Make two batches and freeze one. Reheat fresh-baked rolls briefly before serving to revive their bakery-fresh texture.
- For singles/small households: Bake half the recipe or shape smaller rolls and freeze extras unbaked for next time.
How to Use / Serve This Dish
Classic serving ideas
- With mains: Serve warm rolls with butter beside roast chicken, pot roast, brisket, or a hearty beef stew.
- For soups: Perfect for dipping into creamy potato soup, tomato bisque, or chili.
- Sandwiches: Split and fill with leftover roast turkey, ham, or brisket for quick sliders.
Creative variations
- Breakfast roll-ups: Slice rolls horizontally, spread with cream cheese, and add smoked salmon or scrambled eggs.
- Pull-apart party bread: Arrange rolls in a casserole dish and fill the center with a garlic herb butter or a cheesy filling. Bake until bubbly for a shareable appetizer.
- Sweet twist: Brush warm rolls with a honey-cinnamon butter and serve with fruit preserves for brunch.
Make it seasonal
- Fall/Winter: Pair with slow-cooked stews, roasted root vegetables, and warm apple butter.
- Spring/Summer: Use lighter fillings like lemon-herb chicken salad or fresh tomatoes with basil and burrata.
Pro tip: Warm the butter slightly before brushing so it soaks into the roll surface and enhances flavor. For an especially luxurious finish, add a pinch of sea salt to the melted butter before brushing.
FAQ
Q: Can I use instant yeast instead of active dry yeast?
A: Yes. If you use instant yeast, you can mix it directly into the flour rather than blooming it in milk. Reduce proofing time slightly, but the overall method stays the same.
Q: My rolls came out dense. What went wrong?
A: Common causes include not proofing the yeast properly, using water that was too hot or cold, not allowing the dough to rise long enough, or adding too much flour while kneading. Ensure the milk is warm (105–115°F), let the dough double in a warm spot, and knead until smooth and elastic.
Q: Can I substitute whole wheat flour or gluten-free flour?
A: You can replace up to half the all-purpose flour with whole wheat for a nuttier flavor, but the rolls will be denser. Gluten-free baking requires a tested gluten-free blend and often xanthan gum; results will vary, and you may need recipe-specific adjustments.
Q: How long do these rolls keep after baking?
A: At room temperature in an airtight container, they stay good for about 2 days. For best taste and texture, reheat or freeze if keeping longer.
Conclusion
These Texas Roadhouse Rolls are a warm, comforting staple that bring bakery-style softness and buttered goodness to your home table. They’re forgiving for new bakers, adaptable for seasonal flavors (think herb butter in spring or honey butter in fall), and pair beautifully with rustic mains and hearty soups. If you love classic copycat recipes, you might enjoy testing variations against other beloved versions like the Copycat Texas Roadhouse Rolls | 365 Days of Baking and More or exploring official insights at Made From Scratch | Texas Roadhouse. For another home cook’s take and extra tips, check out Texas Roadhouse Rolls – The Cozy Cook. I’d love to hear how your batch turns out — share a photo, tell me which variation you tried, and pass these buttery rolls along to someone who deserves a warm bite.

Texas Roadhouse Rolls
Ingredients
For the Dough
- 4 cups all-purpose flour
- ¼ cup granulated sugar
- 1 tablespoon active dry yeast
- 1 teaspoon salt
- 1 cup milk, warmed Use whole milk for best richness; 2% works in a pinch.
- ½ cup unsalted butter, melted
- 2 large eggs
- Additional butter for brushing
Instructions
Activate the Yeast
- In a mixing bowl, combine the warmed milk, granulated sugar, and active dry yeast. Stir gently and let it sit until frothy, about 5–10 minutes.
- Tip: If the mixture doesn’t become frothy within 10 minutes, your yeast may be old or the milk too hot/cold. Try again with fresh yeast and ensure the liquid is within the 105–115°F range.
Combine Wet and Dry Ingredients
- Add the melted butter and the two large eggs to the frothy yeast mixture. Stir to combine.
- Add the salt and about half of the flour, mixing until a shaggy dough forms. Gradually add the remaining flour until the dough starts to pull away from the sides of the bowl.
- Tip: Use a stand mixer with a dough hook on low speed for 3–4 minutes, or mix by hand and then knead on a lightly floured surface.
Knead Until Smooth
- Knead the dough until it becomes smooth and elastic. If using a mixer, knead 5–7 minutes; by hand, knead 8–10 minutes.
- Tip: The dough should be slightly tacky but not sticky. Add a teaspoon of flour at a time if it’s too sticky, or a light mist of water if too dry.
First Rise
- Place the dough in a greased bowl, turning it to coat the surface. Cover with plastic wrap or a clean towel and let it rise in a warm, draft-free spot until doubled in size, about 1 hour.
- Tip: A slightly warm oven (turned off) with the oven light on is an excellent proofing spot.
Shape the Rolls
- Punch down the dough to release air. Divide into equal pieces — for dinner-roll size, 12–16 pieces works well. Shape each piece into a snug ball and place them on a parchment-lined baking sheet, snug but not squashed.
- Tip: For uniform rolls, use a kitchen scale and portion about 60–75 grams per roll.
Second Rise
- Cover the shaped rolls loosely with a towel or plastic wrap and let rise another 30 minutes until puffy.
- Tip: This second rise builds tenderness and helps the rolls bake up evenly.
Preheat the Oven
- Preheat the oven to 350°F (175°C). Place a shallow pan filled with hot water on the lower rack if you want extra steam in the oven.
Bake and Finish
- Bake the rolls for 15–20 minutes, until the tops are golden brown. Remove from the oven and immediately brush generously with melted butter before serving.
- Tip: For a shiny, golden top, mix a tablespoon of milk with a beaten egg and brush gently before baking (egg wash). If you prefer softer tops, skip the egg wash and do the post-bake butter brush.


1 thought on “Texas Roadhouse Rolls”